Vetty Creations header

Back to Vetty Creations website

White Threads

new pic from coming book

Smøyg cushion by Yvette Stanton from the forthcoming book Smøyg: Pattern Darning from Norway, due for publication in 2018.
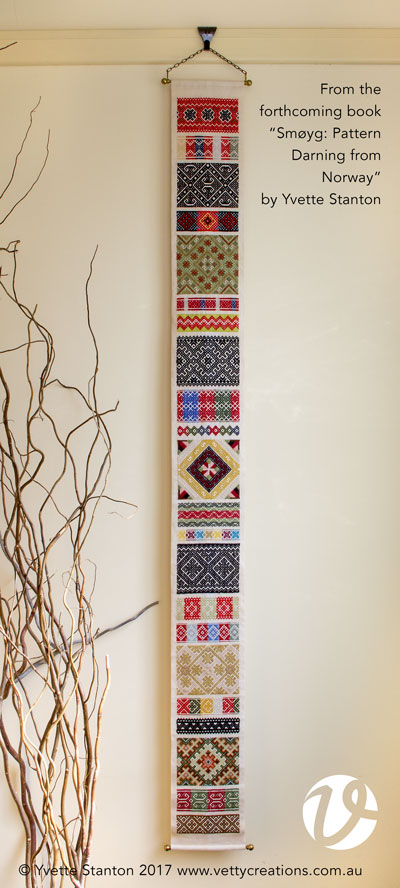
I thought you might like to see this image from my upcoming book “Smøyg: Pattern Darning from Norway”, that I posted on the Vetty Creations Facebook page the other day.

This is a cushion that features the style of smøyg found on kinnlag (baby wraps) from Setesdal in Aust Agder. As is shown in this example, it is usually red with spot motifs in the main section and striped borders along the edges.

I’ve been doing a bit of photography for the book lately. I am trying to get as much done on the book as possible in this next week before I head off on my quick trip to Europe.

Speaking of that trip, I have finished knitting my possum merino jumper (sweater), which will be both light and warm – perfect for travel to a wintery clime. I wasn’t entirely happy with it at first. The bottom of it had a wide rib at the bottom which drew it in and gave it a shape I didn’t like. It was also too long. So I took off the rib (it was knitted top down, so this was easy enough!), and finished it at the top of where the rib had been with a knitted i-cord edging, as had been used at the end of the sleeves. I’m so much happier with it now! There was a bit of yarn left over so I also knitted a matching cloche style hat to cover my ears and keep them warm.

February 1st, 2018 | Category: colour, Smøyg, Smøyg: Pattern Darning from Norway, writing books | 4 comments

Off to Paris!

Waterlilies

Detail of one of Monet’s waterlilies paintings (taken on a previous trip to Paris).


I’m going on a quick trip to Paris!

This year I have to go to Europe to “mystery destination” to do some research for the NEXT book (the one I have decided upon, but not started yet). I was thinking of tacking it onto the end of the needlework cruise from Sydney to Seattle that I’ll be doing (just a short hop across to Europe from North America). As the cruise is itself three weeks long, that was going to make it a very long time to be away from home.

I’ve had the opportunity to contribute to a French language book on whitework, which was planned to be ready in time for Aigulle en Fête in Paris (8-11 February). The reason why they’re doing a book on whitework is because the fete this year focuses on whitework. A craft fair focusing on whitework? In an ideal world, I have to be there!

And so, some months ago, I wondered if I might be able to put the research trip together with the Paris fair. I enquired of the curator that I’ll need to spend time with in “mystery destination”. Due to me missing an email around the time that my grandmother died (I know that’s why I missed it!) I didn’t realise that the curator had said ages ago that would be ok with her. When I found the email, a month or so later, I enquired again if it was *still* ok, but she was then on a break for Christmas/New Year.

When she returned, she confirmed that it would still be fine for me to visit. And so, I booked everything, combining the trip to Aiguille en Fête with a research trip to “mystery destination”.

I had another little plan too. My sister Prue lives in Germany, and she’s an embroiderer too. I wondered if it might be possible for her to join me in Paris for the craft fair. I didn’t tell her of this plan until I knew it was going ahead, because I didn’t want to disappoint her if it didn’t happen. But when it was confirmed, I asked her if she’d like a weekend in Paris with me as a gift from me to her? Er, yes!

So now, not only will I be going to Aiguille en Fête (exciting in itself!), I’ll be doing it with my twin sister! What fun!

As usual, I’ll be travelling light, but that shouldn’t be so hard, because I’ll only be gone for about 9 days. It’ll be winter (not like the hot temperatures we’re having here in Australia currently!) so I need to think winter wardrobe. It occurred to me that when I was in New Zealand this time last year, on a teaching tour, I purchased some possum merino wool to make a jumper (sweater) and started knitting it. Possum wool is incredibly light and warm – perfect for winter travel clothes! So, I’m now on a mission to finish the jumper before I go. It may not be a particularly pleasant experience as the weather is so hot!

I will be meeting up with a fellow stitcher, Anne, at the fête, which will be lovely. I’m looking forward to seeing all the lovely French stitching, including the Au ver a Soie booth. And Prue and I will squeeze in what Parisian sightseeing we can. I’m hoping to visit some needleworky, textiley type shops. Prue hasn’t been to Paris before, so we’ll go to see some Monet, and do some other touristy things.

I will then spend a few days at a museum, with the generous curator, in “mystery destination” to study my chosen style of embroidery for the next book.

So much to look forward to!

January 21st, 2018 | Category: travel, whitework, writing books | 4 comments

From 2017 to 2018

smøyg band samplerOne of the Facebook groups I belong to has asked people to share what they’ve stitched this year. I’ve stitched heaps and most of it will be going into “Smøyg: Pattern Darning from Norway”, so I’m not willing to show it all to you just yet.

However, the biggest thing I’ve stitched this year was definitely my smøyg band sampler, which will be going into the book. I had so much fun stitching this sampler. There are 22 different bands. Each band is from old, historical embroideries from Norway. They come from different regions and different items of clothing which accounts for the wide variety of designs, styles and colours.

If you think the sampler looks long, you’d be right. It’s about 1.2m in length or nearly 4 feet long. However, it’s only very narrow, so each band is very achievable. I found that if I didn’t particularly enjoy stitching a band, it didn’t really matter, because it would soon be finished and I could move on to the next one!

I’ve stitched many other things this year, and am currently working on some class submissions. As always, designing and stitching new things is so enjoyable!

For me, 2018 holds quite a bit of travel. I’ll be teaching on a cruise from Sydney to Seattle in April/May. Then in July, I’ll be heading to the ANZEG conference in Nelson, NZ to teach. And there are shorter trips to Melbourne and country NSW for classes. Of course, I’ll also be teaching locally at The Crewel Gobelin in Killara, Sydney. At some point in the year, I will travel to research for the next book – yes, the next one is already decided. In fact it was decided over a year ago, and no, I am not telling you what it is on yet!

And at some point in the year, “Smøyg: Pattern Darning from Norway” will be published. I’m really looking forward to sharing that with you all. It’s an explosion of colour, and in what will be a relief to many, it isn’t actually a difficult technique!

What have you enjoyed stitching this year? Did you achieve something special this year, like mastering a stitch, or finishing a big work? Or did you make a gift that was gratefully received? I’m not sure if you can attach photos in the comments section of my blog, but if you can, we’d love to share in the celebrations of your achievements. And what are your stitching plans for next year? Do you have specific goals for your embroidery?

Whatever your stitching achievements and plans, whether they’re big or small, Happy New Year!

December 31st, 2017 | Category: Embroidery classes, pattern darning, Smøyg, Smøyg: Pattern Darning from Norway, travel, writing books | 8 comments

Merry Christmas!

Merry Christmas!
Merry Christmas from me to you!

I will note that this snowy image is nothing like what we will experience here in Australia for Christmas. Christmas by the swimming pool is much more usual in our summery climate!

I will be celebrating Christ’s birth this Christmas. I’d love you to join me in worshipping the King.

December 24th, 2017 | Category: whitework | One comment

Looking at Hardanger

The Embroiderers’ Guild of Victoria (BC, Canada) has just started a new series looking at Hardanger on their Facebook page. This is great news, and I shall enjoy following it!

I’m going to be controversial here. I believe that the first post with which they have introduced this next focus, doesn’t actually show any Hardanger at all. That’s right, I don’t think there is any Hardanger on that outfit.

The outfit shown is a bunad (traditional clothing/folk dress) from Fana, which is in Hordaland. Hordaland is the region where Hardangerfjord also is. Hardanger embroidery comes from around the Hardangerfjord, in some of the towns along the shores. However, the bunads from other towns in the region share similarities with the Hardanger bunad. The Fana bunad does look similar to the Hardanger bunad.

five bunads from the Hardanger region of NorwayIf I’m looking for Hardanger embroidery on a bunad (see the examples above), the places I’m likely to find it will be a band of Hardanger embroidery across the white apron; on the cuffs of the shirt, the collar of the shirt, and the front yoke opening of the shirt. If the woman is wearing a headdress, there may be a band of Hardanger around the headdress.

So, looking at the Fana bunad (via the link to the FB post, but also shown here), the places I’d look for Hardanger embroidery would be the same. The cuffs, collar and yoke do not show Hardanger. They possibly have some embroidery (the yoke definitely has some), but it isn’t Hardanger.

So, let’s look at the apron. There are three inset bands across the apron. But are they Hardanger? I don’t think they are.

The first clue that I had was that the design isn’t quite typical of the many apron band designs that I have seen. Sure, I haven’t seen all that there are, but this just didn’t look “right”. I can’t recall ever seeing a Hardanger apron with more than one band of lace, either.

We can think of Hardanger in terms of dense and open, with the most dense (whitest) parts being the satin stitching, the next less dense parts (slightly less white) being the unstitched ground fabric, and the most open (dark/black) parts being the cutwork. If we apply that to the bands in the photograph we can see three levels of density, of white, grey and black. However, the grey part is too dark, and looks way too open to be the ground fabric.

When you insert a band of Hardanger embroidery, the embroidery has to be worked on evenweave linen. Traditionally, they would have used up to 55 or even 60 count linen. It is more common these days though, to use 35/36 count linen. The information in the caption on the FB page said it was made by a retailer that makes bunads, so is likely to be on 35/36 count.

35 count linen isn’t gauzey. It’s quite opaque. Therefore you would expect the ground fabric parts of a design to be opaque. The parts on this design that would be the unstitched ground fabric would be the areas around the attebladrose (the thing we often think of as an eight-pointed star, which is actually a rose). But they’re not the dense white you’d expect them to be; they’re quite grey, making them look like they have some sort of pulled thread work IF they’re embroidered.

I looked up the Fana bunad in The Written Authority on Bunads, “Norsk Bunadleksikon” (ISBN 978-82-04-10819-7, but very hard to get hold of because it is out of print) which is a three volume set on the many, many bunads from across Norway. According to it, when a white apron is used, it usually features crochet bands.

So is it actually crochet that we’re looking at? I think the answer is yes. I went searching for images of similar aprons (using the search term “Fana bunad forkle” because forkle means apron). The clincher for me was this image. It shows a band which is clearly based on the same design, and it is clearly is made of crochet.
A note on the image: I have searched for this particular image to see where it comes from, and I can only locate it on Pinterest. It is captioned “Made by Inger Johanne Wilde”. Just wanting to give appropriate credit.

I therefore make the considered suggestion that the apron shown in the photograph has crochet bands, not Hardanger.

I don’t make these assertions to show up the people/person behind the wonderful Embroiderers’ Guild of Victoria. Their work in spreading the joys of embroidery around the world are LEGENDARY, and we embroiderers love the things they present for our enjoyment and education. (If you’re on Facebook and don’t yet follow them, you should!) I merely point out that not all lace from Norway is Hardanger. 😉 There are actually many other types of whitework done in Norway, and also crochet, as we have now seen.

I have said many a time that I could spend the rest of my life exploring the embroidery of Italy, as there are so many types. The same could easily be said for Norway, as there are so many different types there too. And I have been spending significant time on Norway, having written two books on Hardanger, and am now working on a book on smøyg, which is Norwegian pattern darning.

In the meantime, let’s enjoy the Hardanger series from The Embroiderers’ Guild of Victoria.

December 13th, 2017 | Category: Early-Style Hardanger, Elegant Hardanger Embroidery, hardanger, historical embroidery, Smøyg, whitework | 2 comments

The belle of the ball

The Reader has recently finished her secondary schooling. For many schools in Australia, it is customary to celebrate this achievement with a “formal”. This is usually a formal dinner/dance probably much like a prom in America. At some schools, parents also attend, but at my daughter’s school and the one I attended, it is for Year 12 students and their partners (if they wish to bring one), and school staff. The Reader’s formal was on Tuesday night, but we had begun the planning for her dress at the beginning of the year.

We can’t completely remember how the idea for the style of the dress came about. She liked the idea of a dress that was almost empire line. We spent a bit of time looking at formal dress websites, and found one design that we thought we could use as a basis for the dress. If you take a look at the dress in the link, you can see that the bodice appears to be embroidered and possibly beaded.

Since the needlework cruise that I did some years ago to Singapore, I had been toying with the idea of a dress or cushion or something with peacock feather motifs. I had bought beads and sequins in Singapore with this colour scheme and idea in mind. I must have mentioned this idea to The Reader, because she enthusiastically embraced the idea of it for her bodice.

In February, we purchased the fabric from Sogo Fabrics in Cabramatta. The staff there are always so helpful. She bought teal chiffon and satin charmeuse, and a lighter, brighter green satin charmeuse as well.

Because The Reader and I did a pattern drafting course together some years ago, we have the skills to draft our own patterns. I drafted a bodice, made a toile and tried it on her. (Unfortunately she is way too petite to be able to find or use a dressmaker’s dummy – none with a womanly figure are small enough). It went through three revisions, until I was happy with the fit.

I thought for some months about how I was going to create the peacock feather bodice. I considered creating machine made lace feather motifs. I still think I’d like to try this idea. I had the exquisite creations of Meredith Woolnough in mind. However, in the end I went back to what I know: embroidery and beading.

I bought a plain canvas from one of the local cheap shops and removed the canvas so that I could use the frame for embroidering the bodice front panel. I stretched teal satin over it, and then the chiffon. I then realised that really I needed another base fabric, so while it would have been sensible to put this on the frame first, I attached a layer of plain white cotton onto the back. I traced, then tacked the bodice pattern onto the fabric. I remember tacking around it in the car, while waiting for The Gymnast at a gymnastics training session.

I went through my stash of satins and silks and found the blues and greens I’d been collecting for my nebulous peacock feather “something” for some time. I appliqued the centre shapes of the feather motifs onto the fabric. Then I added the beading. After that, I embroidered feathery, frondy bits in metallic green threads.

embroidering and beading the bodice

Adding some beads

embroidering and beading the bodice

Finishing off a thread on the back

I really enjoyed this part, seeing it take shape. The embroidery process took several months, mostly because I worked on it during the July school holidays, and then set it aside until the next school holidays.

Once the embroidered bodice was finished, I drafted and made a ruched “sash” section to sit just beneath it. This was made from the teal satin.

After this, I drafted the skirt. The plan was to have a full circle skirt for the overskirt, of chiffon, with pleats at the seams of each of the 8 sections of skirt. Adding a 1cm pleat at the waist added about 25cm of circumference at the bottom of the skirt! We’d bought 10 metres of chiffon for all this, but only 3 metres of the lighter green satin charmeuse for the underskirt, as we planned for the underskirt to be a lot less full. It ended up being a half circle skirt, made from four sections.

I thought long and hard about the pleats. In the end, while I keep the fullness I’d added to the pattern to account for them, I realised that it was going to be difficult to make them sit well and look right, seeing the chiffon is see-through. So I decided to dispense with the pleats and just ease the fullness in with some very light gathers at the waist.

Cutting out about 10 metres worth of chiffon into eight skirt sections was not something I was looking forward to. I read up about it, and decided that the best way to do it would be to sandwich the fabric between two light layers of paper. I bought some rolls of paper for this purpose from a local fabric shop. I laid one on the floor, then laid the chiffon over it. I pinned it straight across the end of the paper, and also parallel to each side. I laid the second layer of paper over the top and pinned the two paper layers together. I was trying to pin through the chiffon as little as possible. I then traced the pattern piece onto the top layer of paper and laid some heavy books over it to keep it all in place.

cutting the skirt out

The pattern piece in place on top of the sandwiched layers. Held in place by weights (they’re pewter chess pieces!)

cutting the skirt out

Cutting the sandwiched layers makes it so much easier

The paper sandwich means that particularly when you’re cutting on the bias, the fabric doesn’t stretch and move. It keeps it all nicely straight and means that you can cut the pattern piece out wonderfully accurately. I loved this method!

I did this for the remaining pattern pieces. If I make it sound like a quick process, I don’t mean to mislead. It took me about a day and a half to get all this done! I then cut out the 4 skirt pieces from the charmeuse.

I used normal seams with zigzagged edges (I don’t have an overlocker/serger) for the underskirt, but french seams for the chiffon overskirt. This made it very neat. I left space at the top of the back seam for the zip. I ran two lines of gathering threads around the top of the overskirt, and tacked it to the top of the underskirt. Then these were attached to the bottom of the sash section.

I pondered the zip for a couple of days. I couldn’t figure out how to insert the zip, but then have the two skirt layers floating separately from each other below the zip part of the seam. With a bit of help from Google, I realised that if I inserted the invisible zip in only the underskirt, I could then hand finish the edges of the chiffon zip section, and hand sew them down each side of the zip. This worked well. It’s probably not the way a professional would do it, but it worked fine for me!

before hemming

Before hemming – a little uneven!

The hem. The overskirt had about 11 metres of hem. 11 metres. The underskirt had considerably less! Because the overskirt was made of chiffon which is such a flimsy, moveable fabric, advice said to let it hang for a week before hemming. I didn’t have a week! I only had about 4-5 days, and that included the time I would need for the hemming. So I let it hang as long as I could. With the advice of a colleague, I had decided that hand-hemming the skirt was going to give me the best result.

marking the hem

Marking the hem with the chalk squirter

When I was at the local fabric shop getting a couple of supplies, I saw that they had what I am calling a “chalk squirting hem marker thingy”. The idea is that it stands on the floor, with the “marker” set at the hem height. With the help of a little puffer it squirts a line of chalk onto the fabric, marking the hem. I decided that this would probably help me. And help me it did. Instead of making The Reader stand there in her dress for HOURS and HOURS while I pinned it, I was able to mark the chiffon overskirt’s hem in about half an hour. Hurrah! It was much, much quicker, much easier, and more accurate.

I then set about hemming. I used the method shown in this video. I particularly like that the instructor is left-handed. 😉

The chiffon hem took me one and a half days to complete. Then we did the same thing again for the underskirt hem. Something to keep in mind if you do this sort of thing is that the charmeuse stretches less than the chiffon, which means that when I cut off the extra length (and weight) of the uneven bit at the bottom, the chiffon skirt sprang up much higher than the charmeuse did subsequently. Fortunately I anticipated this, and therefore set the hem height higher for the charmeuse. This way, they ended up about even.

I am happy to say that I finished the dress with 48 hours to spare before the formal! Yay! I used the remaining time to make a small matching clutch for The Reader to carry.

peacock dress

The Reader looking gorgeous in her peacock dress

twirling peacock dress

The all-important twirling photo. With all that skirt, it’s the perfect dress for twirling! You can see the lighter green underskirt.

peacock feather

An emerald peacock feather

peacock feather

A blue peacock feather

peacock dress bodice

The embroidered and beaded bodice

peacock bag

I also made a small bag to match. We called it a glorified pencil case

I think we can call this my dressmaking magnum opus for 2017. While I did make my own formal dresses for Year 10 and Year 12, they were nowhere near as big a deal as this dress, particularly because I drafted this one as well as sewing it. I really enjoyed the challenge of making this dress, and The Reader simply loved wearing it.

Thanks go to Bel of CIAM Australia for teaching me pattern drafting, and to Michelle for advice on the hemming. And thanks to The Reader for allowing me the privilege of making such a lovely dress.

November 17th, 2017 | Category: colour, dressmaking, making stuff, pattern drafting | 19 comments

ANZEG conference 2018 classes

From 13th to 19th July 2018, the ANZEG (Association of New Zealand Embroiderers Guilds) Conference will be held in Nelson, New Zealand. I’ll be teaching at the conference. I will have two classes, and will also deliver a lecture about self-publishing.

Early Style Hardanger Square Panel

Early Style Hardanger Square Panel

Early Style Hardanger Square Panel with tutor Yvette Stanton


Level: Intermediate
Project Size: 9.5×9.5cm
Monday 16th – Tuesday 17th July 2018

Early-style Hardanger was worked at a much smaller scale than we are used to, as they were creating or emulating lace. This workshop reintroduces the old-style Hardanger embroidery; using linen thread on 35 count linen fabric and teaches some old stitches which have fallen out of regular usage.

This is not a class for Hardanger beginners, and there will be some accurate preparatory work required before class. Students will need to know how to properly stitch kloster blocks.

The completed panel can be finished into small mat, pincushion, a needlebook or box top.

Portuguese Whitework Sampler

Portuguese Whitework Sampler

Portuguese Whitework Sampler with tutor Yvette Stanton


Level: All Levels
Project Size: 11.5×11.5cm
Wednesday 18th – Thursday 19th July 2018

This workshop teaches the basics of Portuguese whitework, known as Guimarães embroidery, from northern Portugal. If you are scared of bullion stitch, there is no need to be – this class is a great way to learn and perfect bullions on 38 Count linen.

This sampler is a totally new design and following this class, students should be able to complete any project in Yvette’s Portuguese whitework book or create their own designs.

Students could frame their class piece or make it into a pincushion, cushion, biscornu, needle book etc.

Bookings

Bookings are now open for these classes. More information on the conference and how to book can be found at the conference website. http://www.conference2018.co.nz I look forward to seeing you there!

November 16th, 2017 | Category: Early-Style Hardanger, Embroidery classes, hardanger, historical embroidery, Portuguese embroidery, Portuguese Whitework: Bullion Embroidery from Guimarães, teaching embroidery, travel, whitework | Leave a comment

Goodbye Grandma

My dear Grandma, who celebrated her 100th birthday in June, died Friday week ago. We celebrated her life at her funeral on Monday. My Grandma was always one of my biggest fans. She was one who taught me to knit and crochet (others such as my mum and aunt were involved in this too). She was someone who I could always *make* a present for and I knew it would be appreciated and valued. When she moved from independent living into low care a few years ago, I received back some of the things I’d made her. There’s a patchwork hexie cushion I made her when I was a child, sitting just to my right, as I type this. She always thought everything we grandchildren did was wonderful. I loved her and will miss her.

Did you have a generous and encouraging grandmother or someone else older, who taught you needlecrafts? I think that’s a wonderful gift that older women can give girls and younger women: the gift of skills of creativity.

Grandma and me

Grandma and me at her 100th birthday party.

November 10th, 2017 | Category: embroidery musings, making stuff | 16 comments

Peace and embroidery

Today is International Day of Peace (21st September – if it’s not that date where you are yet, it will be soon!).

Last Saturday at our church we had a fundraiser for the local women’s shelter. The idea was that the creative women of our church set up stalls of their creations for others to buy, we invited the rest of the church and the general public, and all enjoyed a delicious afternoon tea together as we browsed the stalls. There were handmade cards, bath bombs, jewellery, posies of flowers, home made food, leadlight creations, artworks and much more.

One of my friends who was one of the organisers asked me some months ago if I’d have anything to sell. No, not really… I make lots of things, but none of them are for sale. The things I sell are my kits and books etc. So we settled on me displaying my work and having books and kits to sell.
Vetty Creations display
It was a really lovely afternoon, full of enjoying and celebrating each other’s creativity, and some really good food. We also heard from a volunteer from the local women’s shelter who told us how in the past two years that the shelter has been open, they’ve helped 150 women (and presumably associated children) but also had to turn away about 500. They were very grateful for our fundraising, just as I was so pleased to hear of the work they are doing.

But, on to the theme of peace…

One of the lovely ladies of our church, who has always been such an encouragement to me, and at times acted like an extra grandparent to our girls, came and stood in front of my display and drank it all in. She sighed heavily and happily, and said “It just makes me feel so peaceful, looking at your work.”

What a simply lovely thing to say. That my work, that I so love doing, can bring a feeling of peace to someone else, is simply lovely.

My work brings me peace too. How about you: does doing needlework and being creative bring you peace? I know for many of us, it is the time of stillness, of concentration, of slowing right down to work carefully and methodically that brings not only great joy and satisfaction, but also great peace.

Happy International Day of Peace. I hope you get the chance to do some embroidery today.

September 21st, 2017 | Category: embroidery musings, exhibitions, White Threads Blog, whitework | Leave a comment

Celebrating the end of schooling

We’re nearly at the end with The Reader. In just 4 school days time, The Reader will attend her final day of secondary school. Then she’ll have a few weeks holiday (full of study, mind you), a week’s study leave, and then her final exams, stretching over a few weeks.

She’s so very ready to finish school, and would love to get those exams over right now, if possible!

I’ll be heading to Perth in November, right after her exams finish, for some classes with the Western Australian embroiderers guild. The Reader was then going to join me and we’d go sightseeing for a few days, to celebrate the end of her schooling.

However, the other day, a textiley friend mentioned to me that she was going to Tokyo, and was looking forward to fabric shopping while she was there. She’s been before, and said how wonderful it was and how reasonably priced the fabrics are compared to what we have here in Australia. And that got me thinking…

The Reader did the pattern drafting course with me some years back. She’s taking a year’s break next year to work for a bit, before heading to university. And she wants to do lots of sewing during that period. I thought, therefore, that she would love to go fabric shopping. On asking her, the response I got was little excited squeaks of happiness!

I investigated airfares. I found that by purchasing well, we could get airfares to Tokyo for around the same price as going to Perth. It surprised me, but encouraged me! It’s now decided, I will go to Perth, then come home, and we’ll both head to Tokyo for about 5 days. We have friends in Tokyo who have unexpectedly and very generously offered for us to stay with them, which will be so lovely.

Have you been to Tokyo? What textiley, fabricy, embroidery things do you recommend we do/see? I definitely want to see some Kogin, seeing I’m currently writing a book on Norwegian pattern darning, and Kogin is the Japanese pattern darning. We’ll go to Fabric Town (Nippori) and I’ll hope to get to some yarn and embroidery stores if possible. Hit me with your recommendations please!

September 16th, 2017 | Category: dressmaking, embroidery musings, travel, White Threads Blog | 4 comments
« Newer Entries  
  Older Entries »
Yvette Stanton White Threads is the blog of Yvette Stanton, the author, designer, publisher behind Vetty Creations' quality needlework books and embroidery products.

New book now available!

Hardanger Filling Stitches
Hardanger Filling Stitches by Yvette Stanton. Order your copy today!
Find us on Facebook

Archived posts

Categories

  • book reviews (88)
  • Christmas ornament swap (13)
  • colour (6)
  • crazy hair (6)
  • customer embroidery (49)
  • designing (119)
  • dressmaking (26)
  • Early-Style Hardanger (91)
  • Elegant Hardanger Embroidery (42)
  • Elizabethan embroidery (25)
  • Embroidery classes (189)
  • embroidery musings (436)
  • embroidery stitches (206)
  • errata notices (11)
  • Ethnic embroidery (49)
  • exhibitions (111)
  • exploring the needlework internet (10)
  • favourite needlework items (69)
  • FlossTube (102)
  • Frisian whitework (73)
  • goldwork (12)
  • hardanger (232)
  • Hardanger Filling Stitches (72)
  • Hardanger Filling Stitches (1)
  • hints and tips (114)
  • historical embroidery (119)
  • how-to videos (34)
  • illustration (1)
  • Inspirations (25)
  • Introducing… (90)
  • left handed embroidery (78)
  • magazines (10)
  • making stuff (271)
  • merezhka (35)
  • mountmellick embroidery (176)
  • Mountmellick Embroidery: Inspired by Nature (60)
  • mountmellick supplies (49)
  • new products (104)
  • online book previews (7)
  • pattern darning (19)
  • pattern drafting (11)
  • photography (2)
  • Portuguese embroidery (166)
  • Portuguese Whitework: Bullion Embroidery from Guimarães (74)
  • public thanks (32)
  • published projects (27)
  • Punt 'e Nù (32)
  • Sardinian Knotted Embroidery (77)
  • sewing tips (9)
  • Smøyg (41)
  • Smøyg: Pattern Darning from Norway (39)
  • soapbox (6)
  • stitch along (44)
  • stitch dictionary (45)
  • teaching embroidery (192)
  • The Left-Handed Embroiderer's Companion (104)
  • The Right-Handed Embroiderer's Companion (70)
  • travel (172)
  • Ukrainian Drawn Thread Embroidery (35)
  • Uncategorized (169)
  • video previews (5)
  • White Threads Blog (91)
  • whitework (364)
  • writing books (306)