I dreamt about red tucks and darts last night, which might tell you what I was doing yesterday. I completed the cute little pink leotard for my niece and was able to make a start on creating my Butterick B5559 red dress. WITH sleeves – thanks to all who voted on the sleeves or not sleeves question. I could have happily had it with or without, but the majority voted for sleeves, so I’ll go with that.
After reading several accounts of making 5559 on blogs, such as Sew Silly and Life Happens Be Positive, I was a bit daunted about transferring all the tucks and darts to the fabric. However, I appreciated their honesty about the pitfalls of this pattern, which is why I am adding to the general knowledge about making this pattern by adding my comments and the process I used in this blog posting. Hopefully my tips and tricks might help someone else too!
I figured that I needed the foldlines for the tucks on the front of the fabric (and therefore non-permanent marking lines) and the darts on the back. So firstly I traced each pattern piece onto butchers paper so that I didn’t destroy my pattern with whatever method I eventually chose. I then used these to cut out the pattern pieces and left them in place for the transferring of all the important lines.
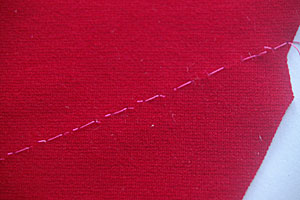
For the darts and tucks I considered using tailor’s chalk, but the only one I have makes very faint useless lines, and rubs the fabric in the process, so that was deemed unacceptable. I considered using water-soluble fabric markers, but they would mean that I could not iron the fabric before it had been washed out. I tried out the tailor’s tack function on my sewing machine, but it was going to give me a zigzagging line, which wasn’t accurate enough in my mind. I was thinking it was going to be a case of hand running stitching along each of the foldlines, when I realised that I could use a very long basting stitch on my sewing machine and simply sew along the foldlines marked on my butchers paper pattern. Yay! That would save hours.
So I did this and then realised that it was going to create a new problem. You see, because the fabric is a knit, I need to stretch it when sewing, so that it retains its stretch, even along the seams. But if I had a line of non-stretchy basting, it would stop me from doing that. Hmm…
While solving this, I tailor tacked all the dart points by hand. That was easy enough, and not overly daunting. I did it at the dinner table while my children were finishing their dinner. I ripped away the paper, which is pretty easy with butchers paper as its only a low grade paper, leaving the basted foldlines and dart markings.
So instead of taking days to mark up all the pattern pieces, which is what I was expecting, it took only about two hours, including the tracing time for making my butchers paper patterns. And then I was able to start sewing. I’ve done the front, and today I should be able to get it finished. I’m loving sewing the ponti. It is firm and stable and lovely to work with.
And yesterday I realised that there will be an excellent opportunity to wear the dress in the near future. Each year, my husband’s school starts the year with a cocktail party. One red party dress coming right up! 🙂
Added later: You can see the finished dress here.


 White Threads is the blog of Yvette Stanton, the author, designer, publisher behind Vetty Creations' quality needlework books and embroidery products.

Sounds like you are well on the way to getting this finished Yvette! And I just know that you will be the belle of the ball (aka cocktail party) in your beautiful red dress.
This is useful advice. I have a similar tucked pattern I would like to make (if I can find a suitable fabric) and I’ve been wondering how to deal with the tucks. Thank you!
Glad to help!
I love the look of this dress, you have potentially saved me hours of frustration. So thank you!
Oh, I do hope so! Have fun making your own. 🙂
Oh, what a great solution! I’ve just bought one of Marcy Tilton’s shirt patterns that has this kind of tucks and had no idea how in the world to get nice clean lines to transfer. Yay! now I do.