Just to recap, so far in the Mountmellick stitch along we have covered tracing the pattern, and getting inspiration for embroidering lily flowers. I suspect that yesterday’s post did not come through in the RSS feed (probably due to my little mistake last week!), so if you didn’t see it, my apologies, and please make sure you check it out.
Now, I’ve decided that I’d like to start with the large, open flower. This has wide outlines on the edges of the petals. Often these are worked in padded satin stitch, or padded buttonhole, and on one historical example that I’ve seen, it was worked in exquisite bullions down one side of each petal, and in padded satin down the other. Another option that I can think of is padded detached chain stitch, ie single chains worked stretched across the padding. There’s another historical one that is outlined in French knots, with rows of stem stitch along inside of that.

Because of the spotted petals, you’ll often find some sort of powdering on Mountmellick lily petals. It could be French knots or small single chain stitches, which are usually scattered across the petals in a pattern.
What to do?
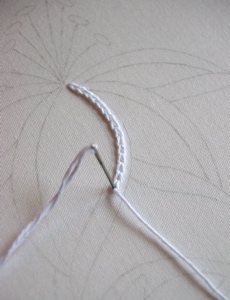
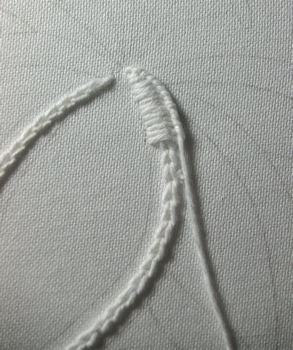
Ok, a bit more poring over my photos, I have decided on padded buttonhole stitch. To do this, I begin with a line of chain stitch down the centre of each petal outline area. I work my chain stitch for Mountmellick stitch in a stab-stitch method, as I find it gives me more control over my stitching.
The line of chain stitch down the centre will raise up the buttonhole stitch in the centre, to give it a bit more height and life.
Once the chain stitch is complete, the buttonhole is worked over the top. I tend to work buttonhole in whatever direction works best. I know that some people can only go in one direction, but sometimes I find that a little limiting.
So firstly, I started off from the petal tip on the right side of the petal, and worked up to the other end. The rolled edge of the buttonhole was on the right. I didn’t like the way the stitches were sitting though. The thread twist was making it so the stitches didn’t sit nicely.
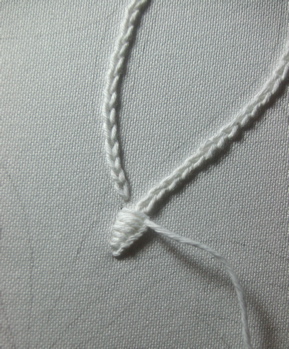
Rather than undoing it (just in case it turned out to be the better option), I left it there and started again with a new thread at the top of the petal, and worked down towards the tip, again with the rolled edge on the right. This produced a much better result, so I then pulled out the bit down the bottom.
I then completed both sides of the petal, keeping the rolled edge on the right down both sides.

You can see how the chain stitch raises the buttonhole stitch up in the middle.
A really important thing when working buttonhole with Mountmellick thread is to make sure the thread keeps its twist. If it gets too twisted, untwist it a bit. (Actually I’ve never had a problem with too much twist!) If it untwists, retwist it. This will give a much better result. Its because the thread is made of so many ply (6 for the No 3 Mountmellick thread which we are using – and no, it is not divisible), and if the thread twist does not stay constant throughout, it becomes really obvious. It does take practice, so work slowly and carefully.
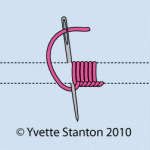
Another important aspect is the angle of your stitches. Because Mountmellick thread is quite thick, if you stitch it as you normally would, with the needle going perpendicular to the outline edges, it can look like the stitches are falling over. To counteract that, you can angle your needle with the tip just slightly back towards the stitching you’ve just done. This will allow just a little extra space at the rolled edge, making the stitch look like its standing up straight rather than falling over.
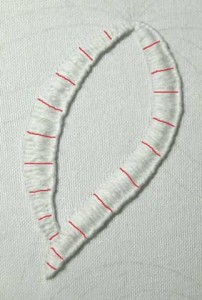
Its also good to try to angle the stitches so that they take the curve of the petal edge into account. Try to keep your stitches perpendicular to the outline. This will mean that the stitches are closer together on the inside edge of the curve, and slightly further apart on the outside edge.

Then the next thing to try to master is that you want the ends of the stitches to make a nice smooth line, with all the ends aligning. If some step in or out even one or two threads, it can make the edge of the buttonhole lose its smoothness.
You will find that such careful stitching takes time. That’s ok. Just take your time. Don’t be afraid to pull out stitches if you’re not happy with how they’re sitting. (I do it all the time!)


 White Threads is the blog of Yvette Stanton, the author, designer, publisher behind Vetty Creations' quality needlework books and embroidery products.

Since you are working on satin do you use an away knot to start?
Great question!
For something like this chain stitch and also the buttonhole stitch, I start with a small amount of running stitch, where most of the stitches are underneath the fabric (hardly anything on top). The running stitch is in the area that I am just about to cover over, so that as I stitch it sometimes even gets stitched through (in the case of the chain stitch) or simply covered over (as in the case of the buttonhole stitch).
In the photo “starting again from the top…” you might be able to see that just between the chain stitch and the working buttonhole thread, there is a small fluffy bit of thread. That’s the tail of my running stitch which I used to start for the buttonhole. But you may not notice it – I only know that its there because I recognise that that is what it is.
When it is a stitch that is narrow and I am not sure that I will be able to cover over the running stitch, then yes, I do use a waste knot. Maybe I should do a post on this!
Do you think the technique of using chain stitch to raise the buttonhole stitch might be relevant to historical raised work? Or is it a purely Montmellick technique?
Elmsley Rose, I’m sorry, but I don’t know! It was the method shown to me when I was in Ireland researching Mountmellick and it works very well, so that’s why I use it. If you are padding a whole shape, rather than just down the middle as here, you can work more than one layer too, to raise it higher.
Great to see the details of the technique, Yvette – thanks for showing us this!
I still haven’t managed to make a start on my piece – hopefully next weekend. In the meantime, I was wondering if there is a particular reason you keep the rolled edge of the buttonhole on the right down both sides of the petal rather than the rolled edge on the left down on side and on the right down the other side of the petal. I’m not really sure why this has occurred to me, but I thought I’d ask.
Hi Sharon, the reason is because I like the effect of it, and also because that’s often how it was done historically. Simple as that. 🙂 Good question!
Hi Yvette: After 5 days at the ice rink for hockey tournament, I am back. I have traced the pattern and finished one petal with chain stitch. Started the buttonhole stitch. I kept on doing it and the thread became untwisted and I forgot to twist it …I need to take out some stitches and twist the thread. Thanks for giving us a very detailed instructions.
Hi Antonia, How did the tournament go? Was it you or a friend or relative taking part?
I think you’ll find that with the thread retwisted you’ll be much happier with the result. It can take a bit of used to, but with practice, it becomes like second nature to just give it a little twist regularly.
Hi Yvette: My daughter is in the Qld team (13 under). Qld came forth. NSW got gold, Silver is WA, Bronze is Vic. The scores were very tight. I helped out in selling tickets and merchandise and serving sausage sizzle.
I have retwisted the thread and am very happy with the result. I learn so much from your instructions.
Congratulations to your daughter!