Many people find it difficult to produce evenly spaced, regular, feather stitch. I have had the privilege of teaching feather stitch to many people in my classes, and I always love it when they say, “I never could do this before. This is wonderful – now I can!”
Last night I decided to try something new. In a book I had seen the idea of working feather stitch on a 45 degree angle. It seemed a little weird, but I decided to give it a go. I figured that it would add ease of inserting the needle, rather than having to stick it in in all sorts of weird angles as is often the case for feather stitch.
Well, to say it went well would be an understatement. I think it may have just revolutionised how I will teach feather stitch in the future!
When I turned the fabric 45 degrees and started to stitch, it materialised into a series of little stacked boxes, and all I needed to do was insert and bring out my needle in the corner of those imaginary boxes. I guess its like a tower of kids’ building blocks, defying gravity!
Because I was so pleased and excited, I decided to write it up as a tutorial for you all. I found that this method was a wonderfully easy way of obtaining beautifully shaped, regular feather stitches.
I’d love to hear your feedback. BUT, first I want you to try it with a needle and thread!
Feather Stitch Tutorial
The building block method!
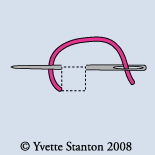 See the first building block?
1. Draw or imagine a small square. Bring the needle out in the square’s bottom left corner. Insert the needle in the top right corner, bringing it out in the top left corner. Take the thread under the needle point.
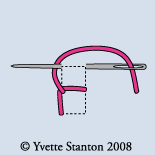 Another building block on top of the first…
2. Pull the needle through. With a new square immediately above the first, insert the needle in the top right corner, bringing it out in the top left corner. Take the thread under the needle point.
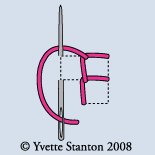 This is the bit where the blocks start to defy gravity!
3. Pull the needle through. With a new square immediately to the left of the previous one, insert the needle in the bottom left corner. Bring it out in the top left corner. Take the thread under the needle point.
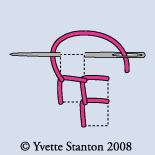 Getting taller and wobblier…
4. Pull the needle through. With a new square above the previous one, insert the needle in the top right corner. Bring it out in the top left corner. Take the thread under the needle point.
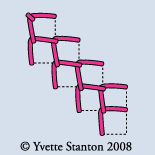 What a fabbo little tower that would be. Enough to make any preschooler proud!
5. Continue in the same pattern. To finish, take a small stitch to anchor the last stitch.
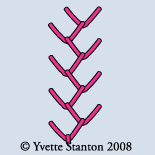 6. Turn the work until the last stitch is at the bottom.
Voila! Beautiful, regular feather stitch!

 White Threads is the blog of Yvette Stanton, the author, designer, publisher behind Vetty Creations' quality needlework books and embroidery products.

great tutorial – I usually teach feather this way – if you think of it as two buttonhole stitches, than another and so on – with turning the work on an angle you can see that its two buttonhole stitches really easily
Brilliant! I’ve scheduled a link to this post to go live on my blog tomorrow morning (Central USA time). I hope it brings you a few extra visitors.
Denise
http://needlework.craftgossip.com
Thanks Sharon, that’s a good point about it being two buttonholes.
Thanks Denise, much appreciated. 🙂
I just came over from CraftGossip-this is such great information, it makes perfect sense! Thanks tons for sharing, I’ll be linking too.
Hi Rachel. Glad you found it helpful.
Thanks for the great tutorial.