Vetty Creations header

Back to Vetty Creations website

White Threads

SAL: roundup of all posts so far

My mother informed me that yesterday was International Left-Handed Day. I don’t know how that one passed me by, but Happy International Left-Handed Day to all my fellow lefties. We of the congenital dispositions…!

I’m a little unwell at the moment, so if you don’t mind (or even if you do!) I’m going to take a break from the Mountmellick embroidery stitch along for a few days. I’m pretty sure you’ve all got enough to be going along with anyway.

So that everything is all together in one place, here’s a roundup of the Mountmellick embroidery stitch along posts so far:
Mountmellick stitch along details
Tracing the pattern
Getting inspiration
Deciding on stitches
Participating fully
Buttonhole petals
Lily centre
Outlined petals and leaves
Coral knot stitch leaf edge
The stem
Opening lily flower
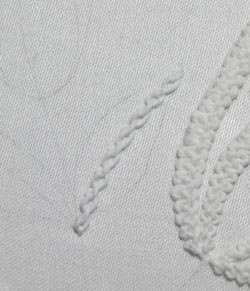
New thread in cable plait stitch
Completed cable plait stitch outline
Centre of opening lily
Next pair of leaves
Fixing the leaf
Leaves finished
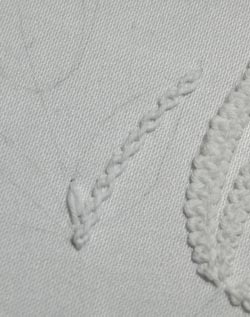
The upper pair of leaves
August 14th, 2010 | Category: stitch along | 5 comments

Valentino in Brisbane

I’ve just found out that there’s currently a Valentino exhibition on in Brisbane! A few years ago when we were in Paris, there was a fabulous exhibition of Valentino gowns at the Musée des Arts Decoratifs. It was wonderful.

I found a selection of photos from the Brisbane exhibition on the ABC news website. I recognise some of the dresses as being ones that I saw in Paris. I just loved his amazing sense of drape and use of fabric.

This is the gallery website, the Queensland Gallery of Modern Art. Reading some of the small print down the bottom of the page, it makes me wonder whether it is the same exhibition that we saw in Paris. Well, I guess there is only one way to properly find out. I wonder how I can get the chance to go?

August 13th, 2010 | Category: designing, favourite needlework items | 6 comments

SAL: the upper pair of leaves

Now we move on to the uppermost pair of leaves, just below the lily flower bud.

I have ummed and aahed about how to work these leaves. I really want to use a filling that fills without having an edging. All our other shapes so far have an edging around them, so I really would prefer not to for this one.

But what?

I’d use long-armed feather stitch, which is always a great way to fill a leaf, but I’ve already used that for another pair of leaves, so I’d rather not use it again. I could use something like cretan stitch (either open or closed) but that doesn’t grab me either. I could fill each side of the leave with bullions, or bullions alternating with straight stitches, but I think you might all not like me very much if I made you work that many bullions! I could use Indian filling stitch, but its not my most favourite stitch to work.

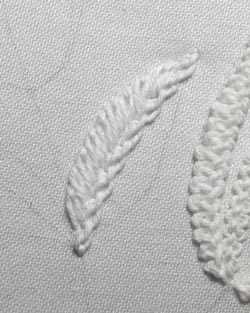
So I’ve settled on a centre vein of cable chain stitch, with the sides of the leaves in slanting, single chain stitches.

cable chain stitch centre veinFirst, I work the centre vein in cable chain stitch. This is a lovely stitch, closely related to cable plait, but turning out with a very different look.

beginning the chain stitchNext I begin the chain stitches up the side. The idea is to work a row of chain stitches that sit next to each other, rather than continuing on from one another end to end. Come up at the base of the leaf on one side of the centre vein. Then work a chain stitch out to the side, aligning the stitch so that it sits along the bottom curved edge of the leaf. To finish the chain, bring your needle up in the chain about 2mm from the edge of the leaf (sorry, no idea what that is in inches – not very long!) and then take the needle back down at the edge of the leaf to anchor the chain stitch.

chain stitched side of leafContinue stitching in the same way up the leaf, angling the stitches so that at the top, the last one ends up nearly parallel with the centre vein.

completed chain stitch fillingThen work the other side in the same way. I find it useful to start at the base of the leaf again and work to the tip, as it helps me with angling the stitches. You can also draw guide lines under the stitching to help you with angling the stitches if you would like to.

Hmmm… I’m not really sure that I like this. I think that the cable chain stitch gets a bit lost in the middle, and its all a bit of a nothingness. Back to the drawing board.

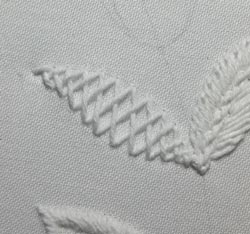
herringbone leafLeaving that in place (just in case!), I’ve decided to work the other leaf (of the pair) in herringbone stitch, because that can fill the leaf without needing an outline around it.

Hmmm… not sure that I like that very much either. It’d probably work ok in crewel embroidery, but for Mountmellick embroidery, its not very leaf-like.

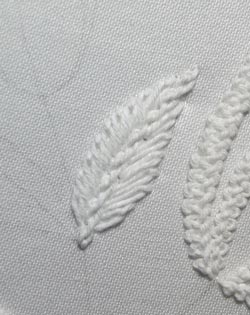
Back to my book Mountmellick Embroidery: Inspired by Nature I go, looking for inspiration and a leaf treatment that might be suitable. In the revised edition of the book, for those of you that have it, on page 11 there’s a photo of a beautiful nightdress case. Looking at the leaves there, there is one similar to my chain stitch leaf, but instead of a centre vein in cable chain stitch, it looks like it has its centre vein in stem stitch. Stem stitch seems to work much better as it gives a stronger line than my cable chain stitch does.

I’m going to take the cable chain stitch out, and then work stem stitch in the gap that is left. It might mean that there’s a slight gap on either side of the stem stitch, but I don’t think that will be a problem, as it will probably just accentuate the centre vein, which is fine.

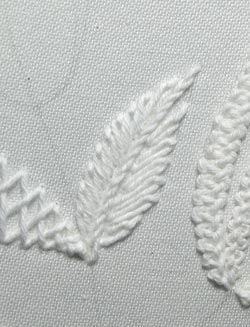
stem stitched centre veinI like this much better.

finished leavesAfter undoing the herringbone leaf, I restitched it in the new style, first working the stem stitched centre vein, then the chain stitches up the side. Because I didn’t have the width of the cable chain stitch to guide the inside end of my chain stitches, I had to remember to leave a small gap in between the chains and the stem.

August 12th, 2010 | Category: embroidery musings, embroidery stitches, mountmellick embroidery, Mountmellick Embroidery: Inspired by Nature, stitch along | 4 comments

4 months on from Ethiopia

We’ve been home from Ethiopia about four months now. I’ve spent a lot of time reflecting on our experiences there. I miss the people very much. I miss the food. I miss the slower pace of life. I miss the temperate climate.

Next week our girls have multicultural day at school. Despite the fact that it will probably be only about 16ºC, they will be wearing their Ethiopian clothes (and freezing, I guess…). I think they’re really looking forward to proudly showing off something of Ethiopian culture.

On multicultural day, they all have to take some food (nut-free, and labelled with all ingredients!) that is supposed to represent some sort of cultural food, to share with their class. Knowing what to take is ALWAYS difficult. I was talking with the school principal the other day about food allergies and what the kids can bring to school to eat, and how nut-free can make it really difficult for the kids who have dairy allergies and can find some of the missing nutrients in nuts… I also mentioned that none of us parents would be upset if we didn’t have to take food for multicultural day – we hate having to think up what to make/take.

Yesterday my younger daughter reminded me that next week it will be multicultural day on Wednesday. She suggested that she could take injera, which is the Ethiopian sourdough flatbread/pancake that forms part of every Ethiopian meal. What a great idea! I’ve found a recipe and will have to give it a go.

It was an interesting suggestion from her, as I don’t think she really liked injera much when we were there. And this is the child who said of Ethiopia when we came back, “I never ever want to go there again!” Absence makes the heart grow fonder, and time softens difficult memories.

All four of us are quite desperate for some real Ethiopian food. There is apparently no Ethiopian restaurant here in Sydney, though we know of two in Canberra, one of which we visited before going to Ethiopia. (Its just a little bit far for a casual meal though, being about 3.5 hours away…) We recently heard of a restaurant in Bankstown, which is a suburb of Sydney, that has Ethiopian food. We looked it up on the internet and had planned to go there last Saturday night for dinner. I rang to make a booking, and the only phone number that we had for it was disconnected. Maybe the restaurant was only open for a short time and has now closed?

We were quite disappointed, so now are looking forward to visiting friends in Canberra later in the year – for the sake of seeing our friends again, but also taking them out to dinner at Fekerte’s Ethiopian Restaurant.

I’d love to go back again to Ethiopia, and the opportunity certainly is there. I really enjoyed our time in Addis. I really loved what I learned about myself, my family and my dependable God. It will be interesting to see what the future holds, whether that is here, in Ethiopia, or another learning experience in another culture or country.

August 11th, 2010 | Category: travel | 11 comments

SAL: leaves finished

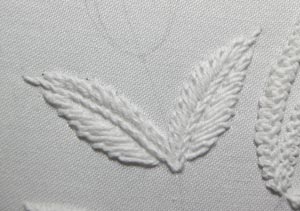
Here are the finished leaves – the set between the opening lily and the open lily. I have not yet decided whether I will add anything to them. I wonder about a centre vein, or adding a row of perhaps small French knots inside the outline of the leaves. I will leave that decision until later, when I can look at the surrounding motifs and their fillings and decide based on what’s already there.Lily leavesNext up will be the remaining pair of leaves just below the lily bud.

August 10th, 2010 | Category: embroidery stitches, mountmellick embroidery, stitch along | 2 comments

SAL: fixing the leaf

I mentioned in my last Mountmellick embroidery stitch along post that I wasn’t entirely happy with the way the stitches sat on the lower left side of the leaf. I wondered if I’d be happy leaving it like that. Of course the answer is “of course not!”

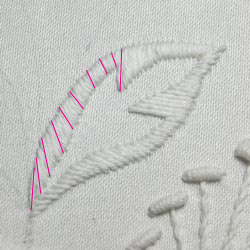
When I drew lines on the picture so I could show you how bad it was, I realised just how bad it was – AWFUL!badly angled stitchesIt really shows you what a horrible job I did of it.

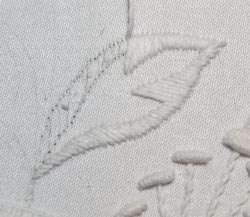
So I pulled all of that part undone. I found that there were lines underneath it (its a few days since I stitched it, and I couldn’t remember) which guided me badly, so I drew new lines over the top and began restitching.

guide lines

new guide lines drawn in

I am using the same piece of thread as before, but because I pulled it all undone, it lost much of its twist. So before I started again, I retwisted the thread back to where it should be. Thankfully its not too furry to re-use. If it was, I would have used a new thread.

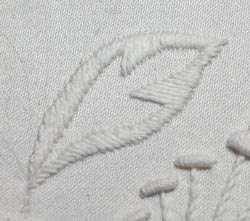
So here’s the finished result. Possibly to the rest of you it doesn’t look too much different, but I am much more content with it now fixed.
fixed leaf

August 9th, 2010 | Category: embroidery musings, embroidery stitches, mountmellick embroidery, stitch along | 4 comments

more left-handed stitch dictionary reviews

As I regularly do, I was visiting Amazon yesterday to have a look to see if anyone had written new reviews of The Left-Handed Embroiderer’s Companion. Umm… yes… they had. Many of them…!

As a left-hander myself, I was very interested to see if this book would improve the constant struggle with learning and implementing new stitches that is present in a world of right-handed instructions. It is a colourful and comprehensive stitch dictionary of 170 stitches, with step-by-step instructions, full descriptions and photographs of the finished stitches (so that you can see how they are supposed to look, and other stitches they go well with). I had a go at a few stitches, armed with stitch books that I have used up until now when needing to tackle a new stitch. I used both to compare the instructions. I was very impressed with the clarity of instruction and the detail given. I found it very easy to create new stitches and was impressed at how well they turned out (especially compared to my attempts following my other books). The book is far superior to my existing ‘stitch bibles’ (which are admittedly from the 1960s) because it contains many more stitches, the visuals are clearer, and you are able to see each step of the way without necessarily having to read the instructions (not always easy mid-stitch). The number of stitches contained in this book also exceeds the selection of either of my older books, so as it stands, it’s a great reference book on many levels. And as it’s targeted at left-handers, that’s an added bonus.
Workshop On The Web

This is the book that all left-handed embroiderers have been waiting for. Containing step-by-step stitch instructions, it has been written specially by a left-hander for left-handers. It explains, clearly and simply together with diagrams, how to stitch over 170 different stitches, including some unusual stitches such as nun stitch, parma stitch, spiral trellis and Breton stitch. Right-handers needn’t feel left out as there is a right-handed version for each stitch too. A stitch dictionary for left-handed embroiderers is long overdue – but this one was worth the wait.
Stitch

The trouble with most embroidery books is that all the diagrams are for right-handed people. Here at last is a book filled with diagrams for over 170 different stitches that left-handers can use without the aid of a mirror. It’s a simple enough idea, but how useful. I am amazed that I have not seen another book like this before, but I haven’t. All the diagrams are in color too, which avoids the problem a lot of black and white diagrams have which show threads – often they look like a bowl of spaghetti or mazes in a puzzle book. Every stitch has several captioned diagrams which also avoids the problem of having to guess what happens between one part of the stitch and the other. There is certainly an impressive list of stitches, many of which I have not previously encountered myself and which had me wishing for a companion volume for right-handers. Each stitch also has a small photograph of a piece of embroidery showing the relevant stitch which is useful, plus a few hints of what the stitch is used for. Variations are shown too, with diagrams on how to achieve this alternative look, as well as a page of instructions for starting and finishing work and tying knots. What you won’t find are any patterns which is perhaps a pity, but there are many other books which have these. If you or somebody you know is left-handed and keen on embroidery then this is the book for them.
Rachel A Hyde Myshelf.com

Are you frustrated by right-handed embroidery instructions, by having to mentally flip them over, use a mirror or substitute the right for left in all instructions? Here is the very solution to the problem as written by a left-handed teacher. The text gives clear step-by-step instructions and illustrates how to do over 170 stitches comfortably and sensibly for the left handed stitcher, using the method which has obviously been tried and tested by a proficient left-handed embroiderer.
Fabrications

“I’ve packaged myself up in a book so that all left-handed stitchers can have their own left-handed teacher.” Thus embroidery instructor Yvette Stanton introduces fellow lefties to her consummate guide to mastering 75 embroidery stitches in 170 variations. Not simply a set of directions for flipping stitch diagrams from left to right, the Companion includes guidance on how to hold the needle comfortably, turn the fabric to its best advantage, choose needles and thread, and much more. Full-color photographs, clear and concise text, and step-by-step color illustrations make stitch instructions easy to follow. This classroom-in-a-book is bound to be the embroidery reference that left-handed embroiderers will want to keep close at hand – the left-hand!
Piecework

Thank you to all the reviewers for their very kind words!

August 8th, 2010 | Category: book reviews, embroidery stitches, left handed embroidery, stitch dictionary, The Left-Handed Embroiderer's Companion | Leave a comment

SAL: next pair of leaves

Back to the Mountmellick embroidery stitch along today, where we are moving on to the pair of leaves above the main lily flower.

Straight away my mind said “it needs to be satin stitch”. This is the classic way to work a leaf like this, with the wide outline worked in satin stitch. I would like to make it very smooth, so rather than padding (which you could also stitch smoothly over) I’ve decided to leave it unpadded so that it can be flat-smooth.

Now, with our buttonhole stitch around the edge of the petals of the main lily, we tried to stitch so that our stitches were perpendicular to the outlines. But as you’ll notice, these leaves have a little bit jutting into the leaf which is very angled. If we kept our stitches perpendicular to the edges of the outlines, we’d end up with a strangely stitched part for the little bit that juts in.

Instead, it makes sense to work on an angle, so that the satin stitches are worked along the angle of the jutting bit. And it also makes sense to start at that part of the outline so that we start with that angle as a guide.
lily leafI like to work coming up on the far side of my satin stitch, inserting my needle on the nearer side. I don’t know why, but I just feel that it gives me a better result. If you prefer to do the opposite, that’s fine with me!

So I’m starting off at the edge of the leaf, preparing to work a stitch that will lay down the edge of the bit that juts into the leaf.

You can also see my running stitch within the stitching area, that I am using to anchor my thread. I’ll stitch over the top of this as I work.
lily leafNow I insert the needle on the close side of the outline.
lily leafI’ve worked a few more stitches, continuing with the same or similar angle for the stitches.
lily leafAt the corner I need to work a number of stitches, splaying out to fill the sharp corner at the leaf tip. At the inside edge of this corner the stitches are crammed in very tight, while at the outside edge they are very widely spaced.
lily leafWorking down the other side of the leaf, I have turned the work so that I can still stitch from the far side to the near side.

As I stitched down this side, I was having trouble getting the angle right. You can see that I have taken out some of the stitches, and drawn in pencil guides to help me get my angle right. As long as these will be covered over (which they will be!), there is no shame in having extra guides to help you. Why make the job any harder than it needs to be, when it could be so much easier with a few little helps?!
lily leafContinuing further down the leaf, I have drawn more guides in because I found them so helpful.
Mountmellick embroidery lily leafAfter stitching down to the stem, I then stitched up the left-hand side of the leaf to meet the beginning of the stitching.

I’m actually not entirely happy with it. I don’t really like the angle of the stitches on the left side of the leaf, below the jutting bit. They don’t sit well. Maybe I’ll take them out, but maybe I’ll just leave it there, remembering the big picture, rather than the tiny details.

Something to take note of: As No 3 Mountmellick thread has 6 ply, it can become very obvious when the amount of twist changes from stitch to stitch. Try to keep the thread evenly twisted throughout the stitching. If this means that you have to manually retwist the thread before taking each stitch, then do it! If it means untwisting it a little, then do that! You are the mistress/master of the thread, so make it do what you want it to!

August 7th, 2010 | Category: embroidery stitches, mountmellick embroidery, mountmellick supplies, stitch along | 7 comments

my favourite stitches

Because I have set you the challenge of thinking about your favourite stitches, I have been considering what mine are. Its not so terribly easy, is it?!

So the easiest thing for me to do was to look through my left and right-handed stitch dictionaries. So here’s my list:

  • up and down buttonhole stitch (p28) – there’s just so much you can do with this stitch, with so many variations
  • cable plait stitch (p38)
  • double chain stitch (p50) – I just like the shapes this one forms
  • hungarian braided chain stitch (p54) – I love the way this interlaces
  • half chevron stitch (p60) – a lovely cross between chevron and cretan stitch
  • cretan catch stitch (p70) – a cross between herringbone and cretan stitch
  • spanish knotted feather stitch (p89) – looks like a pretty braid
  • interlaced herringbone stitch (p104) – I have no idea what you could use this for, but it is pretty!
  • jessica stitch (p106) – a canvas/needlepoint stitch that I need to spend more time experimenting with as it has lots of possibilities
  • palestrina stitch (p117) – lots you can do with this, including joining two edges together
  • plaited braid stitch (p122) – worked in gold thread, this is just gorgeous!
  • queen stitch (p124) – a counted thread stitch which when worked tightly creates an openwork pattern of holes
  • spiral trellis stitch (p154) – with overdyed threads, this can create some wonderful effects

So that’s my list. I’d love to hear yours – and it doesn’t need to be nearly so long. Just one stitch would do!

August 6th, 2010 | Category: embroidery musings, embroidery stitches, favourite needlework items, stitch dictionary, The Left-Handed Embroiderer's Companion, The Right-Handed Embroiderer's Companion | 5 comments

special stitches

It seems that from our Mountmellick embroidery stitch along, some people have discovered the beauty of cable plait stitch for the first time. Its been a favourite of mine for some time because it is so very pretty.

cable plait stitch

cable plait stitch


I discovered all sorts of weird and wonderful stitches while researching and putting together my left and right handed stitch dictionaries.

There are oodles and oodles of stitches out there, but most of the time most people are very conservative in their choice of stitches. Most people stick to quite a limited palette. But amongst our very safe choices (chain stitch, buttonhole/blanket stitch, french knots, stem stitch, cross stitch etc) do you have a special stitch that many others don’t use often that you wish more people knew about?

Can you share it with us? What do you like about it? Do you play around with it – changing its scale, angle, spacing etc? What do you like to use it for? Why should we try it out?

Go on, give us your special stitch pitch!

August 5th, 2010 | Category: embroidery musings, embroidery stitches, mountmellick embroidery, stitch dictionary | 4 comments
« Newer Entries  
  Older Entries »
Yvette Stanton White Threads is the blog of Yvette Stanton, the author, designer, publisher behind Vetty Creations' quality needlework books and embroidery products.

New book now available!

Hardanger Filling Stitches
Hardanger Filling Stitches by Yvette Stanton. Order your copy today!
Find us on Facebook

Archived posts

Categories

  • book reviews (88)
  • Christmas ornament swap (13)
  • colour (6)
  • crazy hair (6)
  • customer embroidery (49)
  • designing (119)
  • dressmaking (26)
  • Early-Style Hardanger (91)
  • Elegant Hardanger Embroidery (42)
  • Elizabethan embroidery (25)
  • Embroidery classes (189)
  • embroidery musings (436)
  • embroidery stitches (206)
  • errata notices (11)
  • Ethnic embroidery (49)
  • exhibitions (111)
  • exploring the needlework internet (10)
  • favourite needlework items (69)
  • FlossTube (102)
  • Frisian whitework (73)
  • goldwork (12)
  • hardanger (232)
  • Hardanger Filling Stitches (72)
  • Hardanger Filling Stitches (1)
  • hints and tips (114)
  • historical embroidery (119)
  • how-to videos (34)
  • illustration (1)
  • Inspirations (25)
  • Introducing… (90)
  • left handed embroidery (78)
  • magazines (10)
  • making stuff (271)
  • merezhka (35)
  • mountmellick embroidery (176)
  • Mountmellick Embroidery: Inspired by Nature (60)
  • mountmellick supplies (49)
  • new products (104)
  • online book previews (7)
  • pattern darning (19)
  • pattern drafting (11)
  • photography (2)
  • Portuguese embroidery (166)
  • Portuguese Whitework: Bullion Embroidery from Guimarães (74)
  • public thanks (32)
  • published projects (27)
  • Punt 'e Nù (32)
  • Sardinian Knotted Embroidery (77)
  • sewing tips (9)
  • Smøyg (41)
  • Smøyg: Pattern Darning from Norway (39)
  • soapbox (6)
  • stitch along (44)
  • stitch dictionary (45)
  • teaching embroidery (192)
  • The Left-Handed Embroiderer's Companion (104)
  • The Right-Handed Embroiderer's Companion (70)
  • travel (172)
  • Ukrainian Drawn Thread Embroidery (35)
  • Uncategorized (169)
  • video previews (5)
  • White Threads Blog (91)
  • whitework (364)
  • writing books (306)