Vetty Creations header

Back to Vetty Creations website

White Threads

SAL: centre of opening lily

I have worked the centre of the opening lily in the same way that I did the open lily flower.
Centre of opening lilyI used stem stitch for the stamens and style, and bullions for the anthers and stigma. The bullions are again wrapped anticlockwise, making them quite fat and pronounced.

You’ll also notice that the stem to the flower is not yet stitched. I have only done the bottom part of the stem so far, down below the large lily, and will stitch the other parts when the leaves and flowers around them are complete. This will give me an easier way to start and finish threads.

August 4th, 2010 | Category: embroidery stitches, mountmellick embroidery, stitch along | Leave a comment

SAL: completed cable plait stitch outline

cable plait stitched outlineThis is the finished cable plait stitch outline of the opening lily.
back of cable plait stitchThis is the back of the lily so that you can get an idea of how spaced apart my cable plait stitches are. A long time ago, I used to pack them in quite close, and then I realised that if I spaced them out a little more, the effect was much neater and more attractive (on the front, that is!).
messed up cable plait stitchThis photo shows how easy it is to mess up cable plait stitch. Because we have worked it quite wide, with just a few simple flicks of the stitching with my fingernails, I’ve made quite a mess of the stitching. It all flattened down nicely again after I took the photo, but it shows you just how unstable the stitch is when it is wide. If this continues to bother me, I’ll show you how we save it. Otherwise I’ll just leave it as is.

That’s all for today – I’m trying to give time for people to catch up!

August 3rd, 2010 | Category: embroidery stitches, mountmellick embroidery, stitch along | 12 comments

SAL: new thread in cable plait stitch

Today in the Mountmellick embroidery stitch along we continue learning more about cable plait stitch.

When you are working cable plait stitch, no doubt at some point you will run out of thread before you finish the part that you are needing to stitch. With cable plait stitch looking to be quite a complicated stitch, how do you finish the old thread and start a new one so that it works ok, and nothing comes undone?

Actually, you can breathe a sigh of relief as its not hard at all!
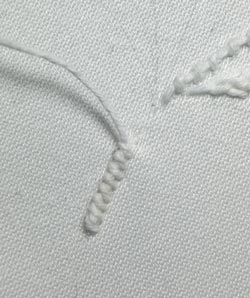
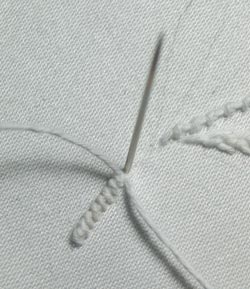
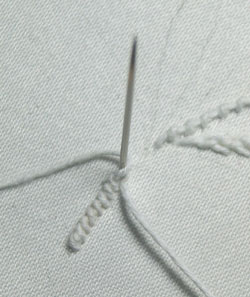
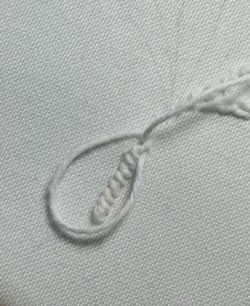
cable plait stitchHere we have our old thread, just finished a cable plait stitch. Though you can’t see, as it is escaping off the side of the photo, there’s not enough for me to continue on.
cable plait stitchTake a short stitch over the final cable plait, on the right side as shown here for left-handers, or on the left side for right-handers. Finish the thread on the back by running it under the back of the stitching, then trim any excess.
cable plait stitchYou can see I have anchored my new thread by doing some running stitch in the area that I am just about to stitch over. Most of this running stitch is on the underside of the fabric so that it doesn’t interfere with how the subsequent stitching sits on the surface of the fabric.

Bring the needle out in the part of the last cable plait stitch where your thread last came out. For lefties, that will be in the loop section on the right, and for right-handers, that will be in the loop section on the left.

Pull the needle through and keep stitching as before.

There, that was easy enough, wasn’t it? I’m happy to do the little anchoring stitch here, that I was not happy to do for buttonhole stitch, as with cable plait stitch it gets covered over, and is completely unnoticeable.

August 2nd, 2010 | Category: designing, embroidery stitches, hints and tips, mountmellick embroidery, stitch along | 4 comments

SAL: opening lily flower

Today, after a little break to hopefully help those who need to catch up to do so, we’re back to our Mountmellick embroidery stitch along. We’re moving on to the opening lily flower. I’ve decided to work this one in cable plait stitch.

Cable plait stitch is one of three stitches that are said to be unique to Mountmellick embroidery. The other two are Mountmellick stitch and Mountmellick thorn stitch. I actually don’t think that cable plait stitch is really unique to Mountmellick – its extremely close relative, braid stitch, is found in other embroidery. They are basically the same stitch, just worked slightly differently.

Cable plait stitch is a highly textured stitch that involves lots of thread and needle manipulation. It can take a little bit of practice to get right, but it is so worth the practice, as it is a gorgeous stitch.

As far as I know, there are no instructions for cable plait stitch anywhere on the internet, so you will need a copy of a book which has step-by-step instructions in it. I recommend:

  • Mountmellick Embroidery: Inspired by Nature
  • The Left-Handed Embroiderer’s Companion – for all the lefties out there!
  • The Right-Handed Embroiderer’s Companion
  • A-Z of Whitework Book 1 – though in my opinion they show it worked much too wide.

I’m starting off with the left side of the left petal. Begin at the top, VERY narrow, and increase the width of the stitches with the width of the petal outline. I choose to insert the needle and bring it out again just inside the guidelines, as when you’re stitching cable plait, those points are not the very edges of the stitch. Because of the loops of thread that sit further out from the entry and exit points of the thread/needle, if you enter and exit right on the guidelines, the stitch ends up being too wide.

One of the things worth knowing about cable plait stitch is that if it is worked wide, it becomes unstable. The narrower it is worked, the more happily it will stay put where you want it. Some of our stitching for these petals is getting towards the widest I would possibly want to do, so just be nice to it!

Here’s what I mean by inserting just inside the guidelines (and you can see that I am left-handed from the direction I am stitching – inserting on the left, bringing out on the right).
cable plait stitch Mountmellickcable plait stitch Mountmellickcable plait stitch Mountmellickcable plait stitch MountmellickThe completed cable plait stitch.
left side of left petal in cable plait stitchThe left side of the petal completed.

Tomorrow we will look at starting a new thread in the midst of cable plait stitch, as no doubt that is something that you will have to do!

August 1st, 2010 | Category: designing, embroidery stitches, mountmellick embroidery, Mountmellick Embroidery: Inspired by Nature, stitch along, The Left-Handed Embroiderer's Companion, The Right-Handed Embroiderer's Companion | 6 comments

Hardanger needlecase

Recently I received a lovely email from Marjolein in the Netherlands. Marjolein was wanting to share some pictures with me, of a hardanger needlecase that she has made, featuring one of the projects from my book Elegant Hardanger Embroidery.

square sampler

Square sampler from Elegant Hardanger Embroidery, stitched by Marjolein from the Netherlands


needlecase front

made up into a needlecase, based on a pattern from Inspirations magazine


needlecase inside

Inside the needlecase


You can see how Marjolein made it up into a beautiful and useful needlecase with lots of wonderful pockets. She based the needlecase on one in an edition of Inspirations magazine. Marjolein chose to interpret my hardanger design into colour, using browns and oranges, rather than the cream on cream that I used in mine.

Congratulations on a wonderful result Marjolein, with beautiful stitching! And thanks for allowing me to share it here.

If you’d like to create your own version of the Square Sampler, the pattern can be found in my book Elegant Hardanger Embroidery. And if you’d like to share with all of us, any of your own work made from one of my designs (whether following the same as mine, or adapted), please let me know!

July 31st, 2010 | Category: customer embroidery, hardanger, Inspirations, making stuff | 4 comments

starting the next book

I have been just itching to get started on my next book, and have been procrastinating with all sorts of other worthy things for long enough! So I made it my aim to finally get going the other night.

I transferred the folder where I had been collecting things for the book, over to my new computer. Imagine my surprise when I opened up the file for the book to find that there was heaps already in it! I obviously already started it before we went to Ethiopia. Oh Happy Day!

So now I just have to really get stuck into it.

I have finished my embroidery for the “Stitch + Stitch = Magic” exhibition and am really pleased with it. I went up to the local picture framers the other day to get some ideas for how to frame it. I was a bit scared off by the prices as its a long time since I have had anything framed by someone else. I used to work as a picture framer when I was at uni, and even used to teach DIY picture framing at the local community college. I have some of the equipment needed to frame things, but not all.

I got some good ideas at the framing shop, and will probably cut the mats, stretch the embroidery, and do all the innards of the frame myself. I’ll get the framing shop to make me the frame and cut me some glass. Then I’ll put it all together.

As with my two stitch dictionaries, I wonder if the embroidery will surprise some people for the amount of colour it has! I think that people often perceive me as a whitework person. Yes, I do love whitework, and always will, but I do love colour too. Perhaps I had too much white in my life for too many years, so a Colour Period is rather nice.

When I finished the embroidery, I felt a small sense of loss that it was over. Yes, I love the finished effect, but I also loved making it, and will miss adding more to it every few days.

But I have a book to write now. 🙂

July 30th, 2010 | Category: designing, making stuff, whitework, writing books | 6 comments

no, its not “sharing”…

Just hopping up on my soapbox here. “Sharing” patterns is not sharing. It is stealing. Pure and simple. It happens all over this industry, and that makes many of us very sad, and even angry.

Here is an explanation of why it hurts designers, and ultimately hurts everyone including the stitchers who are completely honorable, who don’t “share” anything with their nearest and dearest 1000 friends…

July 30th, 2010 | Category: embroidery musings, soapbox | Leave a comment

SAL: the stem

In deciding what stitch to use for the stem, foremost in my mind is the fact that a lily stem is reasonably smooth. Therefore I should use a linear stitch that is reasonably smooth too.

My options could be:

  • stem stitch
  • coral knot stitch – worked close together, not spaced apart
  • couching
  • chain stitch

So, which one should I use? There is no compunction to use a stitch that I haven’t already used. Some of the best Mountmellick embroidery only has a very limited palette of stitches that they use in varied ways to create interest.

Really, any of them would work ok. I feel less excited about couching and chain stitch though, so my choice is between stem stitch and coral knot stitch. I’ve already used both of them, so maybe using coral knot stitch in a different way would be a good option.

The coral knot stitch that I have already used is reasonably well spaced, with about 2 mm between each knot. I could therefore use coral knot stitch that is much more closely spaced, making it look more like a twisted cord, instead of a line with knots along it.
stemstemWorking it like this can be a little tricky. In my classes, I find that students need to practice it quite a bit to get it working right. Its because you need to work the stitches really close together – practically underneath the previous stitch.
stemInsert the needle right next to the last stitch, even to the point of slightly underneath the previous stitch, just to the right of the stem guide line. stemCome up on the left of the line, just a few threads away from where the needle went in, right next to the previous knot. Leave the needle in the fabric for now.stemTake the thread coming out of the previous knot around the needle in an anticlockwise direction.stemPull the needle through…stem…thereby tightening the stitch into a nice neat knot.

If you’re finding it a little difficult, practice it first with some other thread, such as thick perle cotton or even some 4 ply knitting cotton.

If it seems too spaced apart, try inserting your needle even closer to the previous knot than you think seems reasonable. And then bring it out again closer than you think is reasonable. It might just end up being about right.

And for the record, in Mountmellick embroidery, coral knot stitch is often called “snail trail”. 🙂

July 29th, 2010 | Category: designing, embroidery stitches, mountmellick embroidery, stitch along | 2 comments

SAL: coral knot stitch leaf edge

I’m using my new big hoop (because I got it for my birthday and I want to use it!). In working the coral knot stitch, I’m finding it is difficult to insert the needle in a sewing action without some of the fabric threads of the satin weave breaking. To stop this from happening, I am working it in a stab motion.

Of course, I could also take it out of the hoop, slacken the fabric tension off, or just use a smaller hoop so that I can reach to manipulate the needle with my finger, but I’m being persistent about the bigger hoop, because I can have much more of the design visible at once. (Honestly, it would be much easier and probably happier all round to use my smaller hoop…)

To work coral knot stitch as a stab stitch, rather than using a sewing motion, its a bit slower as there are more steps involved.

coral knot stitchSo here we are, stitching along with coral knot stitch. I’ve spaced the knots out a bit, so that they’re not too close together.
coral knot stitch - on the backOn the back you can see that very very little of the coral knot stitching is on the back. This is because you take the needle under only the tiniest bit of fabric (usually just a few threads). This is because if your stitch is too long, you’ll never be able to make a nice small neat coral knot stitch. Too long a stitch makes too large a knot.

To start the next stitch, take the needle into the fabric a short way along (this distance governs the distance between knots), just to the right of the outline of the leaf. Don’t insert the needle too far away from the line, as this is the start of the tiny stitch under the fabric. (This step isn’t shown… sorry about that!)
coral knot stitchBring the needle up again, just on the other side of the line, creating the very short stitch under the fabric. Do not bring the needle the whole way through yet – leave it sitting in the fabric.
coral knot stitchTake the working thread around the needle, in an anticlockwise direction.

Pull the needle through, making a small neat knot. Keep cycling through the steps to make a line of stab-stitched coral knot stitch.

Of course, if you want you can work normal coral knot stitch. I just found that this method of coral knot stitch worked better for me. It produces exactly the same result, but just allowed me more control as I was stitching.

As a round up, here’s the list of stitch along posts so far:
Mountmellick stitch along details
Tracing the pattern
Getting inspiration
Deciding on stitches
Participating fully
Buttonhole petals
Lily centre
Outlined petals and leaves

July 28th, 2010 | Category: designing, embroidery stitches, mountmellick embroidery, stitch along | 2 comments

SAL: outlined petals and leaves

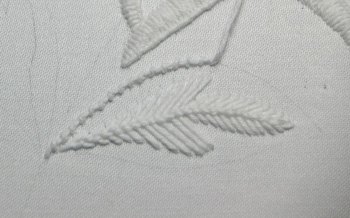
After working the large lily flower, I have now turned my attention to the pair of leaves below the flower. Traditionally in Mountmellick embroidery, when leaves are in groups e.g. pairs, three, five, etc, the whole group is worked similarly, not each leaf worked differently.

When I am designing, I like to have a good balance of outline/filled motifs with non-outlined/filled motifs. By this I mean that if all the motifs have a distinct outline then a filling worked inside, it can all look a bit the same. So I like to also have some that are just filling stitches, with no outline. And sometimes, depending on the width of the outline and the size of the motif, sometimes just an outline with no filling.

Because of the way the leaves are drawn (and the pair above the large flower) it means that we have a large quantity of petals and leaves that have a wide outline around each, with a centre that can either be left empty or filled with a filling stitch.

One of the easiest way to work a leaf like the type we have, is to work the outline in buttonhole or satin stitch, leaving the centre empty. But if I do that, then it will be too similar to the petals, which have a wide buttonholed outline, with centres filled with french knots.

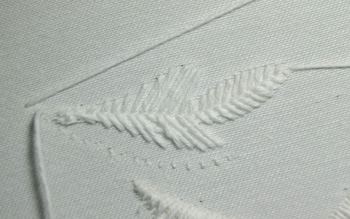
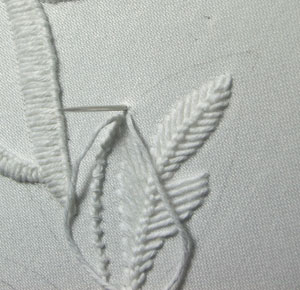
So, how to get around this? I’ve decided to fill the centre of each leaf with a closely spaced long-armed feather stitch. This give the centre a good filled coverage. Then the outline will be worked in coral knot stitch which will create a very narrow border, with a gap of unfilled negative space, and then the long-armed feather stitch filling in the centre.
lily leafTo work long-armed feather stitch as shown, each of the stitches is worked very close together. Sometimes people find this a bit difficult to get the spacing so close together if they’ve never done it before.

Because of the way feather stitch works, every second stitch’s outer end reaches out to the opposite side, but all the inner ends are right down the centre. This means that the spacing between stitches is approximately twice as close in the centre (down the vein) as it is at the edges of the shape. I say only “approximately” because we also have to take into account the curve of the leaf, which means that on one side the stitches will be slightly closer together (the inner side of the curve), than the other side.

To get your feather stitch as close together as mine is, you really need to bring your needle out on the centre vein right next to the previous stitch – even coming out slightly below the previous stitch for even closer stitching. This can take some practice, so you may like to try a test leaf elsewhere first.

Let’s see that in action:
long-armed feather stitchOk, so to start we bring the needle out at the tip end – if you bring it out at the other end, the veins will be going the wrong way! I’ve done a bit already so that you can see what we are aiming for.

To work the next stitch, insert the needle on the right-hand side of the shape, using regular spacing. You can see that the stitches are quite close together. I’m going in only 1-2mm (I’m sorry, I don’t know what that is in inches, but its very short!) below the last stitch.
long-armed feather stitchPull the needle through, but leave the working thread loose in a great big loop – don’t pull the stitch flat against the fabric yet. Keep the working thread out of the way, so that you can see where you are going to bring your needle back up again.

Bring the needle out right next to the previous stitch at the centre vein. This is MUCH closer to the previous stitch at the middle, than it is at the edge. This is because all the stitches come up at the centre, but only every second stitch goes out to a side: half go to the left, half go to the right, meaning that you only get half as many on each side, and therefore they can be further spaced apart.
long-armed feather stitchTake the working thread around the needle – not wrapping, but just so that the needle is now coming up in the large loop.
long-armed feather stitchPull the needle through, so that the stitch tightens and curves gently against where the working thread now comes out.

Insert the needle in the left side, using similar spacing as is already used on that side.

If your leaf curves at all, you will need to adjust the spacing on the sides so that the veins curve with the shape of the leaf. You’ll need slightly less spacing on the inside curve of the leaf edge, and slightly more on the outer curve.
long-armed feather stitchPull the needle through, leaving a great big loop of working thread. Keeping the thread out of the way so that you can see properly, bring the needle out in the middle, right below the previous stitch. Make sure that the needle comes up within the great big loop.
long-armed feather stitchPull the needle through to tighten the stitch around where the thread now comes out.
long-armed feather stitchKeep stitching, taking stitches out to alternate sides, to complete the leaf.

Just to note also, the centre vein isn’t actually drawn onto the leaf, so you can either just imagine it, or draw it in lightly yourself.

Though you can already see the coral stitch edging stitched here, tomorrow I’ll go through how I got it to look like that!

July 27th, 2010 | Category: designing, embroidery stitches, mountmellick embroidery, stitch along | 2 comments
« Newer Entries  
  Older Entries »
Yvette Stanton White Threads is the blog of Yvette Stanton, the author, designer, publisher behind Vetty Creations' quality needlework books and embroidery products.

New book now available!

Hardanger Filling Stitches
Hardanger Filling Stitches by Yvette Stanton. Order your copy today!
Find us on Facebook

Archived posts

Categories

  • book reviews (88)
  • Christmas ornament swap (13)
  • colour (6)
  • crazy hair (6)
  • customer embroidery (49)
  • designing (119)
  • dressmaking (26)
  • Early-Style Hardanger (91)
  • Elegant Hardanger Embroidery (42)
  • Elizabethan embroidery (25)
  • Embroidery classes (189)
  • embroidery musings (436)
  • embroidery stitches (206)
  • errata notices (11)
  • Ethnic embroidery (49)
  • exhibitions (111)
  • exploring the needlework internet (10)
  • favourite needlework items (69)
  • FlossTube (102)
  • Frisian whitework (73)
  • goldwork (12)
  • hardanger (232)
  • Hardanger Filling Stitches (72)
  • Hardanger Filling Stitches (1)
  • hints and tips (114)
  • historical embroidery (119)
  • how-to videos (34)
  • illustration (1)
  • Inspirations (25)
  • Introducing… (90)
  • left handed embroidery (78)
  • magazines (10)
  • making stuff (271)
  • merezhka (35)
  • mountmellick embroidery (176)
  • Mountmellick Embroidery: Inspired by Nature (60)
  • mountmellick supplies (49)
  • new products (104)
  • online book previews (7)
  • pattern darning (19)
  • pattern drafting (11)
  • photography (2)
  • Portuguese embroidery (166)
  • Portuguese Whitework: Bullion Embroidery from Guimarães (74)
  • public thanks (32)
  • published projects (27)
  • Punt 'e Nù (32)
  • Sardinian Knotted Embroidery (77)
  • sewing tips (9)
  • Smøyg (41)
  • Smøyg: Pattern Darning from Norway (39)
  • soapbox (6)
  • stitch along (44)
  • stitch dictionary (45)
  • teaching embroidery (192)
  • The Left-Handed Embroiderer's Companion (104)
  • The Right-Handed Embroiderer's Companion (70)
  • travel (172)
  • Ukrainian Drawn Thread Embroidery (35)
  • Uncategorized (169)
  • video previews (5)
  • White Threads Blog (91)
  • whitework (364)
  • writing books (306)