Vetty Creations header

Back to Vetty Creations website

White Threads

SAL: nearly there!

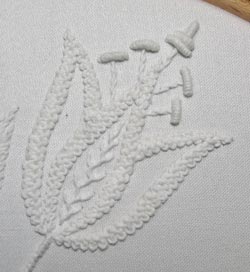
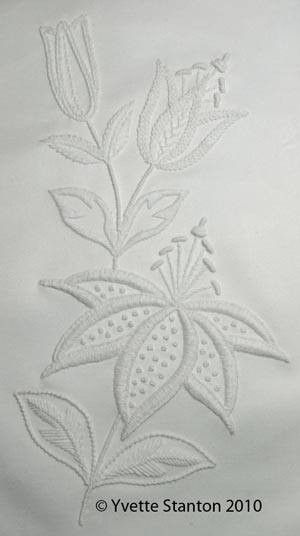
Mountmellick embroidery lily

Mountmellick embroidery lily ©Yvette Stanton 2010


Ta Da! The finished main design. From yesterday’s bud, all I needed to do was finish the top part of the stem, which is now done.

From here, I have to work the buttonhole edge for the cushion. I don’t have it drawn onto my fabric, because at the stage I drew mine on, I hadn’t added the cushion edge to the pattern yet. All of you who have purchased the pattern had the cushion edge (or the runner edge, if you are doing the runner) as part of the pattern, so you should have already traced the edge on as part of the whole design.

I’ll have to line up my main design with the pattern as best as possible, then trace the border on.

After that, the cushion can be constructed (hmm… I must buy a zip). If you’re doing the runner, you can omit this step, but you have twice as much stitching as the rest of us anyway, so I think that more than makes up for it!

Then we have the fun of knitting the fringe! I would very much like to film a short video of me knitting the fringe so that you can see it. But that very much depends on whether I can get the video feature on our little point and shoot digital camera to work. Don’t hold your breath on that one…!

So there’s a little to go, but we’re getting very close!
August 24th, 2010 | Category: mountmellick embroidery, stitch along, whitework | 4 comments

SAL: lily bud

Well. I’m still a bit bereft of ideas for how to work the lily bud. Looking at the whole design, I think it needs to be a thin outline (perhaps), with a light filling. This is because the other parts of the design that are nearby have either wide outlines or are completely filled. The next closest bits that have a narrow outline are the pair of leaves right at the bottom.

But then maybe not.

Um…

Ok, so I’m going to try using a stem stitch outline, and see where that takes me. I have used stem stitch already, as the stamen-y bits (I still can’t remember their proper names!), but there is certainly no problem with using a stitch more than once, especially if you use it in different ways. I think I may have said before that some of the best Mountmellick embroidery uses only a limited palette of stitches. It is not an exercise in using as many different stitches as possible… (unlike the embroideries for the covers of my left and right-handed stitch dictionaries, or my embroidery for Stitch+Stitch=Magic!)
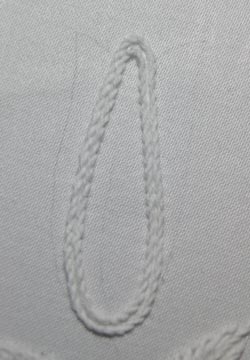
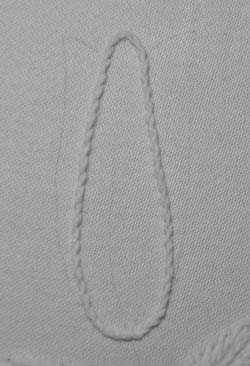
stem stitch outlineI’ve started with the central petal of the bud, outlining it in stem stitch.
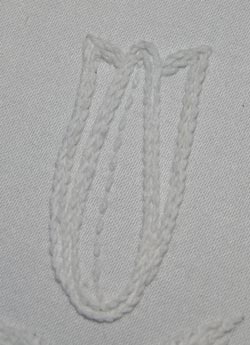
double row of stem stitchNow I’ve worked another line of stem stitch just inside the first.
outlined bud with running stitch veinThe completed double stem stitch outline, with the centre vein of the petal worked in running stitch.

Yeah, I’m happy with that. 🙂

August 23rd, 2010 | Category: designing, embroidery stitches, mountmellick embroidery, stitch along, The Left-Handed Embroiderer's Companion, The Right-Handed Embroiderer's Companion, whitework | 2 comments

SAL: opening lily again

Back to the opening lily flower. I’ve filled the central petal with some feather stitch. I left a small gap inside the cable plait stitch outline, then starting at the tip, worked down the petal. If I started at the bottom, the feather stitch would look upside-down!

Because the width of the petal changes, the size of the feather stitches also change. At the top and bottom, the stitches are narrow and short, widening and lengthening in the middle of the petal.
opening lily centre petal
I’ve decided to leave the two side petals empty. I just think they would look a bit full if I put stitching in them also. You are welcome to fill yours if you prefer!

Next step is to work on the final lily flower – the bud at the top of the design. I’m a bit bereft of ideas… Maybe by tomorrow…?

By the way, I’ve been interested to see that many of you feel that you have been learning lots during this stitch along. I’d love to know what you’ve learnt! To me, this is all just run of the mill stuff, but I figure its interesting for you to see what I think through as I design and work a piece of Mountmellick embroidery.

I am seriously considering doing another stitch along at some time in the future, as this one has gone so well. I’d love to do one on merezhka, which is Ukrainian drawn thread embroidery. Don’t get too excited though – I have no idea when it might be, because I’m going to need a good break from stitch alongs at the conclusion of this one! 🙂 Some days my blog has felt like a ravenously hungry beast that has demanded to be fed!

August 22nd, 2010 | Category: embroidery stitches, mountmellick embroidery, stitch along, whitework | 5 comments

Stitch+Stitch=Magic

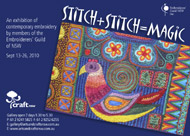
stitch+stitch=magic exhibition
I found out yesterday that my embroidery for the Stitch+Stitch=Magic exhibition has been accepted! I really enjoyed working the piece, so I am pleased that it has been accepted.

My exhibit is called “Coloured Contours” and is an exploration of colour, stitch and texture. It uses my technique of working on hand-dyed wool felt, and using the colour gradations to guide the placement of the stitching. I have a photo, but I’m pretty sure I’m not allowed to show it to you yet. (All exhibits had to be not previously published anywhere.)

The exhibition will be on from 14 September until 26 September 2010, at Craft NSW, 104 George Street, The Rocks, Sydney. Open seven days 9.30 am to 5.30 pm.

August 21st, 2010 | Category: designing, making stuff | 5 comments

Multicultural day photos

Multicultural Day went really well the other day. Apparently the injera got eaten happily.

For the last hour of the day, family and friends are invited to watch all the kids parade in their costumes. Its wonderful to see, and I often marvel at the Korean parents allowing their daughters to come in their amazing (but very large and puffy) dresses. It just never seems to be particularly school-friendly attire!

The parade also makes me feel that here in Australia, we are rather culturally poor, when you consider the regional and national costumes of other nations and people groups. Can’t really say there’s anything particularly Australian in terms of clothes.

There were a few outfits that really caught my eye in the parade. Two “Ethiopian” girls for starters…Ethiopian clothesEthiopian clothes
Then there was a little girl who had the most amazing clothes with mirrors. I figured the outfit was from somewhere in central Asia, like the Hindu Kush region of Pakistan, or something like that. I spoke to her mum later, who told me they were from Herat in Afghanistan. (Herat is in the west of the country, towards the border with Iran.)Herat dress
Later I also spotted her older sister.Herat clothes
And then the two of them together at the end of the day.Herat sisters
Such a rich cultural heritage. With Australian (European) culture being so young – about 200 years – we really don’t have anything like that to draw upon.

August 20th, 2010 | Category: Ethnic embroidery, historical embroidery, travel | One comment

SAL: progress to date

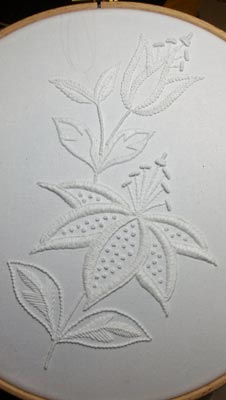
Mountmellick stitch along lilyHere’s the first full pic that we’ve seen of the whole design in our Mountmellick stitch along. I’ve finished the French knots in the petals, and put in all the stems except the last bit up to the final flower (the bud).

I’m thinking of putting a sparse filling in the petals of the opening flower. Might give that a go next, because I can always take it out if I don’t like it!

August 19th, 2010 | Category: mountmellick embroidery, stitch along | 11 comments

Ethiopian day

Today is multicultural day at my daughters’ school. They’re going dressed in their hand embroidered Ethiopian clothes. Hopefully I’ve had a chance to add a photo to this post for you.

I would have written more, but I spent so much time plaiting their hair last night (1 hour each) and making the injera (another hour) that I ran out of time to do anything on the Mountmellick embroidery stitch along. The injera has turned out nothing like real injera, but quite frankly how many of their classmates will have tried the real thing and know it well enough to compare?!

Their clothes feature traditional Ethiopian embroidered crosses. These are based on the motifs of Ethiopian Orthodox Christianity. Much of Ethiopian embroidery features such crosses, usually worked mostly in chain stitch, in wool, on hand-woven cotton fabric. Colours can range from bright and cheery, to darker and more subdued. I’m not sure what is traditional and what is more to do with tourist tastes. Certainly colourschemes featuring Ethiopian national colours (red, yellow, green) would be traditional, as they are very proud of their colours.

Ethiopian colours are found everywhere in Addis. One day on the way across town in a taxi, I decided to note all the places that I saw them. They were used in stripes on power poles, in on food sacks, on clothing, shop fronts…

The girls’ outfits are in two different colour schemes. Elder daughter has bright blue, black and a tan brown colour. Younger daughter has black, red and white. We have been blessed by a reasonably warm day, so hopefully neither of them freeze.

Younger daughter is so excited by the plaits I put in her hair. They’re not real corn rows as they would have in Ethiopia, but then neither of our girls have the tight curls of Ethiopian hair either! If they’re comfortable, I think she plans to keep them in for a few days. We’ll see how comfortable she finds them! Elder daughter liked them too, but was so tired by the time I finished that she just wanted to go to bed!

I hope they have a wonderful day proudly showing off their Ethiopian-ness!

August 18th, 2010 | Category: historical embroidery, travel | One comment

SAL: filling the petals with spots

Today we are heading back to our very first flower, in this Mountmellick embroidery stitch along. My intention was always to put some filling in these petals. If we remember the photos of the lilies that I had right near the beginning of the stitch along, you may have noticed that lilies often have some spots on their petals. Depending on the lily, these may be very prominent or not even really there.

We’re going to make a feature of them on the petal, which will provide more texture and pattern for the overall appearance. The idea is to fill the petals with a scattering of French knots.

I’m using the darner needle (which I can’t remember if I mentioned it previously, but it should also be used for all the bullion knots too) to work the French knots. We use a darner needle because its eye is not much thicker than the shaft of the needle. For knots, where possible we use milliner’s or straw needles (two different names for the same type of needle). They are perfect for knot stitches as their eye is the same width as the rest of the needle, meaning that its much easier to pull the needle through the knot’s wraps. Unfortunately, milliner’s/straws don’t come in a large enough size for Mountmellick thread, so we have to use the next best option, which is darner needles. They’re not *quite* as good as straws, but they’re pretty good!

My French knots have two wraps each.
scattered French knots

“Randomly” scattering things can be a little hard to do sometimes, so what strategy do I use? In actual fact, my French knots are anything but randomly placed, but equally they are not measured out.

petal showing "random" scattering strategyI start at the top of the petal, with a French knot that is a little distance away from the buttonhole stitching. Then I move downwards, placing the knots so that they form the corners of approximately equilateral triangles. They’re deliberately not exactly equilateral, but I find that it does help to space them reasonably evenly, without looking like they’re all in neat little rows, like trees in an orchard!

I’ve also circled a spot where I did work a French knot, but took it out again, because it ended up too close to the buttonhole stitching. I wasn’t sure, so I put it in, then decided it didn’t look any good.

You can fill the other petals of the same flower similarly, but as the spaces are smaller, there’ll be fewer knots.filled petals

August 17th, 2010 | Category: embroidery stitches, mountmellick embroidery, mountmellick supplies, stitch along | 6 comments

White threads with a difference

As you know, the title of this blog is White Threads, due to my enduring love of whitework. Today I came across some whitework with a difference: Quaker cross stitch worked as whitework. Its stunning!

Check out the gorgeous whitework version of the Mary Wigham sampler at Needleprint. It was stitched by Willy de Boer.

That’s all for today. Nearly back to good health! 🙂

August 16th, 2010 | Category: historical embroidery, whitework | 5 comments

Cable plait stitch and plaited braid stitch

What’s the difference between cable plait stitch and plaited braid stitch?

cable plait stitch

cable plait stitch


This is cable plait stitch. It is the stitch used in Mountmellick embroidery. It is a reasonably simple stitch, with only a few steps. Also known as figure of eight stitch to the ladies of Mountmellick, because that’s what each stitch looks a bit like.

Each stitch (or the sequence of steps that goes to make up a single cable plait) is worked separately and sits on the fabric separately (though with so little distance between that it is negligible). Individual cable plaits do not interact or interlace with each other.

When worked wide, (shown here about the widest I would be happy to do) it becomes very unstable. It can be worked quite narrow, which creates a slightly different, more compact, knotty look.

It looks like a simple braid on the surface of the fabric.

plaited braid stitch

plaited braid stitch


Below left is plaited braid stitch. There are two lines shown as each is worked with a different method to create the same result. You can read more about this at a previous post on plaited braid stitch.

It is usually worked in gold or silver thread, and comes from Elizabethan embroidery. It is a more complicated stitch to work than cable plait stitch. Each individual stitch looks a little like a pretzel. (Though if you look at the cable plait stitch picture, each one of them looks like an upside down pretzel… interesting…)

Each stitch (or the sequence of stitches that go to make up a single plaited braid stitch) interlock with the ones one each side of it, so that the effect is much more interwoven than for cable plait stitch.

If this stitch is worked too wide, the stitches start to look too squat. This can be solved by using a thicker thread or narrowing the width. It is quite a stable stitch because of all the interlocking.

It looks like an intricate braid on the surface of the fabric.

I guess an interesting experiment would be to work both stitches in the same thread to see how they compare then. Here we are comparing two different threads, and the thread (its stiffness or otherwise) can really affect ease of stitch construction. With plaited braid stitch it really helps to have a thread with some “body”, but this is not necessary for cable plait stitch.

At some point, I think I’ll have to prepare some samples of each in the same thread. Perhaps one each in Mountmellick thread and one each in gold thread, so that we can compare better.

I have a hunch that in actual fact they’re not all that dissimilar. Just that plaited braid stitch is more interlaced with the stitches on either side.

August 15th, 2010 | Category: Elizabethan embroidery, embroidery musings, embroidery stitches, goldwork, mountmellick embroidery, mountmellick supplies | 6 comments
« Newer Entries  
  Older Entries »
Yvette Stanton White Threads is the blog of Yvette Stanton, the author, designer, publisher behind Vetty Creations' quality needlework books and embroidery products.

New book now available!

Hardanger Filling Stitches
Hardanger Filling Stitches by Yvette Stanton. Order your copy today!
Find us on Facebook

Archived posts

Categories

  • book reviews (88)
  • Christmas ornament swap (13)
  • colour (6)
  • crazy hair (6)
  • customer embroidery (49)
  • designing (119)
  • dressmaking (26)
  • Early-Style Hardanger (91)
  • Elegant Hardanger Embroidery (42)
  • Elizabethan embroidery (25)
  • Embroidery classes (189)
  • embroidery musings (436)
  • embroidery stitches (206)
  • errata notices (11)
  • Ethnic embroidery (49)
  • exhibitions (111)
  • exploring the needlework internet (10)
  • favourite needlework items (69)
  • FlossTube (102)
  • Frisian whitework (73)
  • goldwork (12)
  • hardanger (232)
  • Hardanger Filling Stitches (72)
  • Hardanger Filling Stitches (1)
  • hints and tips (114)
  • historical embroidery (119)
  • how-to videos (34)
  • illustration (1)
  • Inspirations (25)
  • Introducing… (90)
  • left handed embroidery (78)
  • magazines (10)
  • making stuff (271)
  • merezhka (35)
  • mountmellick embroidery (176)
  • Mountmellick Embroidery: Inspired by Nature (60)
  • mountmellick supplies (49)
  • new products (104)
  • online book previews (7)
  • pattern darning (19)
  • pattern drafting (11)
  • photography (2)
  • Portuguese embroidery (166)
  • Portuguese Whitework: Bullion Embroidery from Guimarães (74)
  • public thanks (32)
  • published projects (27)
  • Punt 'e Nù (32)
  • Sardinian Knotted Embroidery (77)
  • sewing tips (9)
  • Smøyg (41)
  • Smøyg: Pattern Darning from Norway (39)
  • soapbox (6)
  • stitch along (44)
  • stitch dictionary (45)
  • teaching embroidery (192)
  • The Left-Handed Embroiderer's Companion (104)
  • The Right-Handed Embroiderer's Companion (70)
  • travel (172)
  • Ukrainian Drawn Thread Embroidery (35)
  • Uncategorized (169)
  • video previews (5)
  • White Threads Blog (91)
  • whitework (364)
  • writing books (306)