Vetty Creations header

Back to Vetty Creations website

White Threads

SAL: lily centre

Ok, a little botany lesson here, courtesy of my botanical artist sister and co-author Prue. I have no idea what the bits in the centre of the lily are called (I think I’ve been calling them sepals…), but fortunately she does!
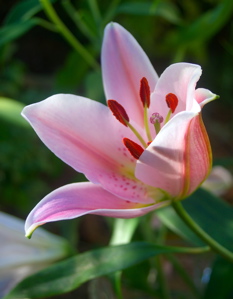
botany lessonSo, the centre bit that sticks up is the style, and the knobby bit at the top of it is the stigma. The six sticky up bits around that are stamens, and the long orange bits with the pollen on them are the anthers.

These are the next bits that we’re going to work on our Mountmellick lily.
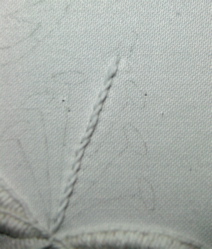
stem stitched styleFirst, work the style in stem stitch, from the bottom to the top, finishing in the middle of the stigma outline.
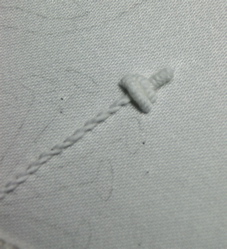
bullion stitch stigmaThen work the stigma as three bullions. You’ll want to change to the darner needle for this, as its eye is a little smaller than the chenille needle’s eye. First, work the centre bullion, going from the top of the stem stitch, up to the top of the stigma outline. Then work two bullions across at the base, overlapping the first bullion and the stem top.

For these bullions, I have chosen to wrap anticlockwise, as with the thread being S twist, it gives more pronounced wraps and makes for a fatter bullion.
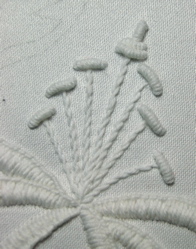
lily centreThe stamens are worked as stem stitch, and the anthers are a single bullion at the top of each stamen.
completed large lilyThe completed large lily flower – well, for now. We’ll come back to it later to work some stitching in the petals.
July 26th, 2010 | Category: embroidery stitches, mountmellick embroidery, stitch along | One comment

playing with feather stitch

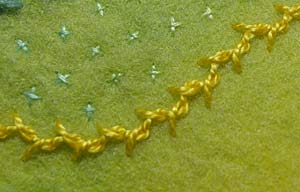
I was working on my exhibition embroidery recently and decided to test something that I had been wondering about. I had been pondering what would happen if you worked a feather stitch, stab-wise (ie, not scooping), but instead of just bringing the needle up inside the curve of working thread, you wrapped the thread round the needle once and then pulled it through.

I figured that you might get a feather stitch with a twist. Imagine my surprise when it came up looking like alternating twisted chain stitch (page 44 of both my stitch dictionaries)! But, thinking about it, they are extremely similar, just the feather stitch version is a little wider, and more stepped-from-side-to-side-looking.
twisted feather stitch

My next wonder is what would happen if you wrapped it more than once… Hmmm… that’s definitely worth a try. Might start getting into Mountmellick thorn stitch territory… (page 113 of the stitch dictionaries)

Oh, I love playing with stitches!

July 25th, 2010 | Category: embroidery musings, embroidery stitches, stitch dictionary, The Left-Handed Embroiderer's Companion, The Right-Handed Embroiderer's Companion | 2 comments

SAL: buttonhole petals

When you’ve done the first petal of the large lily, you can also work the others too in the same way.
buttonholed petalsbuttonholed petals
The “dirty” spots that you can see on the surrounding fabric are actually needle holes from where I have parked my needle at various stages. They will go!

I might just make the statement here that I have the fabric mounted taut in a hoop. This is because I find it gives a much better result for my stitching. It keeps the fabric flat and helps to stop puckering in the stitches. It can make working some of the stitches a little difficult though, so for stitches such as chain stitch (if you don’t want to work it as a stab stitch) and cable plait stitch, it can be useful to slacken off the fabric in the hoop.

So, let’s talk about starting and finishing threads.

For the chain stitch and the buttonhole stitch, I tend to work about 3-4cm/1.5inches of running stitch in the area that I am about stitch over. I work it so that most of the running stitch is on the underside of the fabric, and very little is on top. Then I just work over the top of it. The chain stitch generally gets worked right over and into it, so that the running stitch is held in place very securely. The buttonhole simply covers it over.

To finish chain stitch, on the back I run the needle under about 5 stitches and then trim the excess. To finish buttonhole stitch, I run the needle under about 3-4cm/1.5 inches of stitching on the back, and trim the excess. This tends to be enough, and even if you then have to boil the work at the end, I’ve never had any problems with the threads working loose.

Now, what if we have to start a new thread in the midst of working buttonhole? Can we make it a completely smooth join so that no-one ever knows any different? Yes!
buttonhole new threadTo finish the old thread, take the needle to the back as if you were about to work the next stitch.

buttonhole new threadLeaving the stitch a little loose on the front, unthread the needle at the back. Rethread the needle with a new thread, and run it under the back of the stitching to anchor it. If you want to be sure its not going to move, you can take a backstitch under one of the threads on the back, as you run it under the back of the stitching.

Bring the new thread out at the rolled edge of the buttonhole, in the same place you would have if you had been taking any normal buttonhole stitch.

buttonhole new threadTighten the previous stitch that was left hanging loose, by pulling on the end of the old thread. On the back, thread it into another needle and run it under the back of the stitching to finish it off. On the front, continue stitching as before, enjoying the seamless change of threads!

July 24th, 2010 | Category: embroidery stitches, mountmellick embroidery, stitch along, whitework | 7 comments

SAL: participating fully

I know there a quite a number of us who are joining in for the stitch along, but so that its not just me posting my progress for the world to see, I’d love for you to share your progress regularly too. If you have a blog, maybe you could post your progress there so that we can all see. Or maybe you have a Flickr stream or similar?

However you plan to share your progress – and I really encourage that, because we can all learn from each other and be encouraged by each other’s progress – please let us know where we can see it in the comment section of this post.

And for something to look at and drool over while you’re supposed to be working on your lilies, check out the finalists for the 2010 Hand & Lock Prize.

July 23rd, 2010 | Category: stitch along | One comment

thinking about merezhka

Ukrainian Drawn Thread Embroidery Recently I have received several emails from people expressing their desire for more merezhka patterns as a follow on from my book Ukrainian Drawn Thread Embroidery: Merezhka Poltavska.

I would love to be able to do something about this, but I am really battling with the fact that there is still just one of me! Sure, I am an identical twin, but that’s just not the same as having a clone. (wink!) So I feel I am going to have to do a bit of lateral thinking to try to solve this problem.

I don’t use model stitchers, mostly because I don’t know anyone else who does my type of stitching who would be interested in model stitching. But maybe that’s something I could consider. I also have extremely high personal standards for my stitching… but that doesn’t mean that others wouldn’t meet those standards.

So, very much just testing the waters here, is there anyone who has learnt merezhka from the two learning samplers in my book or from a class with me, who would be interested in submitting a sample of their work to me? At this stage, its probably best if it was only Australian and New Zealand stitchers – not because of any dislike of stitchers elsewhere, its just that domestic and nearly domestic postage is much cheaper and faster!

If you are interested in talking with me about model stitching, please don’t post me anything yet! I think the best thing would be if you could send me a good quality closeup photo of your merezhka work, both front and back. My desire to see the back of the work is only so that I can see that the technique is correct, not because I want to see how neat it is! You can email them to me at:
ystantonfish @ iprimusfish dot comfish dot aufish (remove the fishes!)

If I was to take this further (and I am not making any promises, just really thinking it all through at the moment), then I would need model stitchers of a very high standard, who can complete work quickly.

Could this be you? And even if its not, if you know someone who might be interested, please get them to contact me.

July 22nd, 2010 | Category: embroidery musings, merezhka, Ukrainian Drawn Thread Embroidery, writing books | Leave a comment

SAL: deciding on stitches

Just to recap, so far in the Mountmellick stitch along we have covered tracing the pattern, and getting inspiration for embroidering lily flowers. I suspect that yesterday’s post did not come through in the RSS feed (probably due to my little mistake last week!), so if you didn’t see it, my apologies, and please make sure you check it out.

Now, I’ve decided that I’d like to start with the large, open flower. This has wide outlines on the edges of the petals. Often these are worked in padded satin stitch, or padded buttonhole, and on one historical example that I’ve seen, it was worked in exquisite bullions down one side of each petal, and in padded satin down the other. Another option that I can think of is padded detached chain stitch, ie single chains worked stretched across the padding. There’s another historical one that is outlined in French knots, with rows of stem stitch along inside of that.
spotted lily petals
Because of the spotted petals, you’ll often find some sort of powdering on Mountmellick lily petals. It could be French knots or small single chain stitches, which are usually scattered across the petals in a pattern.

What to do?

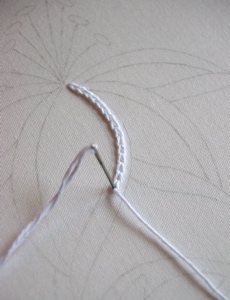
Ok, a bit more poring over my photos, I have decided on padded buttonhole stitch. To do this, I begin with a line of chain stitch down the centre of each petal outline area. I work my chain stitch for Mountmellick stitch in a stab-stitch method, as I find it gives me more control over my stitching.

stab stitching the chain

Stab stitching the chain stitch down the middle of the petal outline


The line of chain stitch down the centre will raise up the buttonhole stitch in the centre, to give it a bit more height and life.
chain stitch on petal outline

Chain stitch down the middle of the petal outline


Once the chain stitch is complete, the buttonhole is worked over the top. I tend to work buttonhole in whatever direction works best. I know that some people can only go in one direction, but sometimes I find that a little limiting.

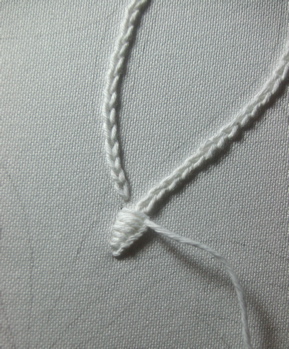
So firstly, I started off from the petal tip on the right side of the petal, and worked up to the other end. The rolled edge of the buttonhole was on the right. I didn’t like the way the stitches were sitting though. The thread twist was making it so the stitches didn’t sit nicely.

buttonholing

Starting from the petal tip


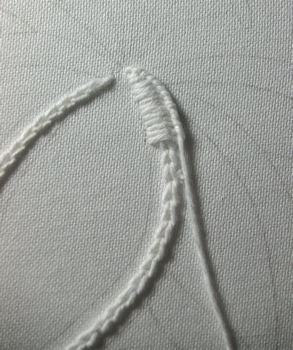
Rather than undoing it (just in case it turned out to be the better option), I left it there and started again with a new thread at the top of the petal, and worked down towards the tip, again with the rolled edge on the right. This produced a much better result, so I then pulled out the bit down the bottom.
starting from the top

Starting again from the top of the petal


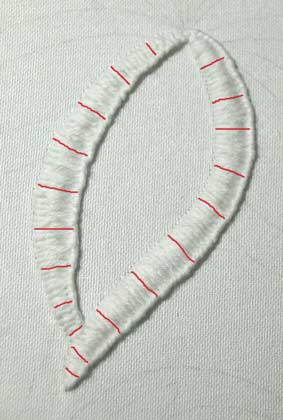
I then completed both sides of the petal, keeping the rolled edge on the right down both sides.completed petal outline
You can see how the chain stitch raises the buttonhole stitch up in the middle.

A really important thing when working buttonhole with Mountmellick thread is to make sure the thread keeps its twist. If it gets too twisted, untwist it a bit. (Actually I’ve never had a problem with too much twist!) If it untwists, retwist it. This will give a much better result. Its because the thread is made of so many ply (6 for the No 3 Mountmellick thread which we are using – and no, it is not divisible), and if the thread twist does not stay constant throughout, it becomes really obvious. It does take practice, so work slowly and carefully.
angled buttonhole
Another important aspect is the angle of your stitches. Because Mountmellick thread is quite thick, if you stitch it as you normally would, with the needle going perpendicular to the outline edges, it can look like the stitches are falling over. To counteract that, you can angle your needle with the tip just slightly back towards the stitching you’ve just done. This will allow just a little extra space at the rolled edge, making the stitch look like its standing up straight rather than falling over.
angle of buttonhole stitches
Its also good to try to angle the stitches so that they take the curve of the petal edge into account. Try to keep your stitches perpendicular to the outline. This will mean that the stitches are closer together on the inside edge of the curve, and slightly further apart on the outside edge.
smooth edge of buttonhole stitches
Then the next thing to try to master is that you want the ends of the stitches to make a nice smooth line, with all the ends aligning. If some step in or out even one or two threads, it can make the edge of the buttonhole lose its smoothness.

You will find that such careful stitching takes time. That’s ok. Just take your time. Don’t be afraid to pull out stitches if you’re not happy with how they’re sitting. (I do it all the time!)

July 22nd, 2010 | Category: designing, embroidery stitches, historical embroidery, making stuff, mountmellick embroidery, Mountmellick Embroidery: Inspired by Nature, stitch along | 11 comments

SAL: getting inspiration

I usually don’t plan out much of my stitch placement before I start a Mountmellick embroidery design. Sometimes I’ll have some of an idea of what I’d like to use, and maybe a vague idea of where, or perhaps a particular treatment for a specific motif, but much of the time I just figure it out as I go along.

I’ll get out my photo album filled with photos that I was allowed to take as reference when I was writing our book “Mountmellick Embroidery: Inspired by Nature”, when I was in Ireland and England quite some years back. I use these to inspire me, in terms of stitch combinations and ideas for stitch placement. These photos are invaluable for me, and for others I’d highly recommend soaking up what you can see in photos of historical examples of Mountmellick embroidery, if you’re designing your own Mountmellick embroidery.

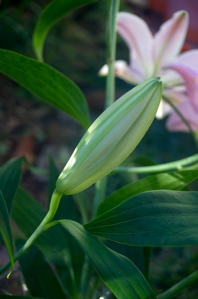
But let’s take a look at some gorgeous lilies. I find them so elegant.
lily
lily
lilies and buds
close up lily
lily part open
lily bud
part open lily
lily stem
When thinking about how to interpret motifs into stitch, I also think about the plants that I will be depicting. If its a rose, then I need to think about smooth velvety petals, leaves with jaggedy edges, and sharp thorny stems. As we’re doing lilies, then I need to think about lilies and LOOK at lilies. Lilies generally have smoothish petals, with some ridges going down them. Sometimes they have spots close to the centre of the flower. The leaves also often have ridges (though Mountmellick lilies don’t seem to be shown like that, so maybe they were different lilies than I am thinking about.)

But on the whole, lilies are a smoothish looking plant, with long graceful curves for the leaves and petals, and smoothish stems. I love the stamens and sepals (if that’s what they are called) of lilies – the bits sticking out of the centre of the flower – as they are very pronounced and prominent, usually calling for some nice fat bullion knots…

The reason why I study how the plant looks is because that affects my stitch choice. If I want a smooth and velvety look, then that’s not going to be best served by a spiky looking stitch. If I want spiky, then smooth stitches aren’t going to be the best choice either.

Of course, I don’t slavishly follow this, but its good to keep it in mind.

July 21st, 2010 | Category: designing, embroidery stitches, historical embroidery, mountmellick embroidery, Mountmellick Embroidery: Inspired by Nature, stitch along | One comment

SAL: tracing the pattern

Welcome to the Mountmellick embroidery stitch along! Even if you have decided not to stitch along with us, I’m glad that you’re following along. I welcome all questions. Just because I understand my reasoning for doing certain things doesn’t mean that you do! So please ask questions and make comments.

The first thing we need to do is to trace the pattern onto the fabric. Importantly, the front of the fabric is the smooth satin side. You see longer lengths of thread stretching across the surface of the fabric on the front, than you do on the back.

I have not pre-washed my fabric, as with this fabric, it can make it quite difficult to get the needle through. This MAY mean that it will shrink slightly in one (or both) directions at the end, when rinsed/washed, but as this is very good quality fabric, it shouldn’t be much, and that’s a chance I’ll have to take.

I have ironed my fabric – I’m using a fat quarter of the 100% cotton satin jean. I’m planning to make my stitch along project into a cushion, and a fat quarter is enough fabric for this.

For tracing, I lay the pattern onto my lightbox, and then lay the fabric over the top, right side up. I pin it in place so that it won’t move while I trace. If you don’t have a lightbox, you might be able to hold it up to a lighted window and trace it there, or if you have a glass-top coffee table, you could put it on that with a lamp shining up from below.

I use an HB clicky pencil – you know the ones, with lead that you click up – to trace it on. If you don’t have a clicky pencil, make sure your pencil is sharp so that it produces a fine line. Trace with a fine line and a light touch. You do not want a HEAVY DARK line, as that will not only discolour your thread as you stitch, making everything grubby, but it will also be a nightmare to try to wash out. Do yourself a favour, and make sure your lines are as pale as you can possibly make them, while still being able to to see them. They will need to either be covered over, or able to wash out.

I do not recommend using pens/markers that wash out or fade away. I just don’t feel that these are safe, and I can’t say what will happen to them long term. Therefore I feel that it is safer to use an HB pencil.

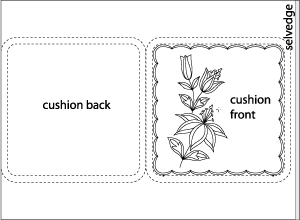
Because I need both a front and a back out of the fabric, I need to make sure that I can get both out of the one piece of fabric. To do this, I am going to use the following pattern layout on my fabric.Mountmellick lily cushion pattern layoutI’ll be tracing the outside of the pattern only (the cushion back) onto the side of the fat quarter without the selvedge (the selvedge is the uncut edge of the fabric). This needs to be as close to the cut edge as possible, to allow as much room for the cushion front (to be embroidered) on the remaining fabric. Then the cushion front, outlines and all, except for the centre marker, should be traced right next to it. This will allow for the maximum amount of fabric all around the design, which will help during the embroidery process.
tracing on the Mountmellick design
Here you can see my pattern traced on. I traced it on before adding the cushion outside edge onto the pattern, so I’ll have to add that later. Not ideal, but sometimes you don’t think of these things beforehand!

I’m not going to cut the fabric yet, as it will give me more to hold onto around the edges as I embroider, if I don’t cut the section for the back of the cushion off yet.

If you are doing the lily runner instead of the cushion, trace the pattern onto the centre of the fabric, or thereabouts.

In our next installment I will talk about getting inspiration from real life plants for how to interpret lily motifs into stitch.

July 20th, 2010 | Category: designing, making stuff, mountmellick embroidery, mountmellick supplies, stitch along | 7 comments

unicorn tapestries

I’ve recently finished reading The Lady and The Unicorn by Tracy Chevalier. It was interesting to read her fictional story of how the tapestries came to be, and the family and people around them.

I love the Unicorn tapestries. They are just gorgeous, and when we were in New York several years ago, we visited The Cloisters to see the set that they have there.

I particularly love the millefleurs – the millions of flowers in the background. They are beautiful, and one of the things that I also particularly love in William Morris’ woven tapestries, with the millefleurs usually designed by John Henry Dearle.

I wrote an article a few years ago for Inspirations magazine on the meaning of flowers. While we just think they are pretty flowers, they all had symbolic meaning. All quite fascinating!

But one of the things that caught my imagination most about “The Lady and The Unicorn” was the woad dyer, always stinking of urine. It would really make you weigh up whether you really wanted to have blue in your tapestry…

Just a reminder that we start our Mountmellick stitch along tomorrow. 🙂

July 19th, 2010 | Category: historical embroidery, Inspirations | 4 comments

composing music, designing embroidery

The other day we were listening to a choral work on the radio. As I listened, I tried to fathom how anyone could write such music (I cannot read music, though I very much enjoy singing). With all those voices coming in at different spots, singing different things, how could anyone conceive of that?

In an effort to understand, I tried to liken it to my design process. Do I EVER envisage a completed embroidery before I start? No, of course not. So would the composer have imagined the completed choral work in his head, and then written it down as is? I feel that it is unlikely.

Normally, when I design, I start with an idea or two, and build on them. I start with the bare bones and then add to it, take bits away, and keep working until I am happy with the result.

So its quite probable that the composer also started with an idea or two – maybe a snatch of melody or a harmony – and then started to build. Maybe he sat down at a piano and worked on bits and put it all together. Then maybe he got some people to sing it, and then made further changes. That, to me, seems to be a more achievable process for composing.

But what about people like Beethoven, who is said to have composed some of is most beautiful works after he went deaf? That just boggles the mind. The closest thing I can think of to that in my line of work, would be designing an embroidery in colour which is perfect and harmonious, while not being able to see colour.

So I guess that’s when we know that we are encountering real genius!

July 18th, 2010 | Category: designing, embroidery musings | One comment
« Newer Entries  
  Older Entries »
Yvette Stanton White Threads is the blog of Yvette Stanton, the author, designer, publisher behind Vetty Creations' quality needlework books and embroidery products.

New book now available!

Hardanger Filling Stitches
Hardanger Filling Stitches by Yvette Stanton. Order your copy today!
Find us on Facebook

Archived posts

Categories

  • book reviews (88)
  • Christmas ornament swap (13)
  • colour (6)
  • crazy hair (6)
  • customer embroidery (49)
  • designing (119)
  • dressmaking (26)
  • Early-Style Hardanger (91)
  • Elegant Hardanger Embroidery (42)
  • Elizabethan embroidery (25)
  • Embroidery classes (189)
  • embroidery musings (436)
  • embroidery stitches (206)
  • errata notices (11)
  • Ethnic embroidery (49)
  • exhibitions (111)
  • exploring the needlework internet (10)
  • favourite needlework items (69)
  • FlossTube (102)
  • Frisian whitework (73)
  • goldwork (12)
  • hardanger (232)
  • Hardanger Filling Stitches (72)
  • Hardanger Filling Stitches (1)
  • hints and tips (114)
  • historical embroidery (119)
  • how-to videos (34)
  • illustration (1)
  • Inspirations (25)
  • Introducing… (90)
  • left handed embroidery (78)
  • magazines (10)
  • making stuff (271)
  • merezhka (35)
  • mountmellick embroidery (176)
  • Mountmellick Embroidery: Inspired by Nature (60)
  • mountmellick supplies (49)
  • new products (104)
  • online book previews (7)
  • pattern darning (19)
  • pattern drafting (11)
  • photography (2)
  • Portuguese embroidery (166)
  • Portuguese Whitework: Bullion Embroidery from Guimarães (74)
  • public thanks (32)
  • published projects (27)
  • Punt 'e Nù (32)
  • Sardinian Knotted Embroidery (77)
  • sewing tips (9)
  • Smøyg (41)
  • Smøyg: Pattern Darning from Norway (39)
  • soapbox (6)
  • stitch along (44)
  • stitch dictionary (45)
  • teaching embroidery (192)
  • The Left-Handed Embroiderer's Companion (104)
  • The Right-Handed Embroiderer's Companion (70)
  • travel (172)
  • Ukrainian Drawn Thread Embroidery (35)
  • Uncategorized (169)
  • video previews (5)
  • White Threads Blog (91)
  • whitework (364)
  • writing books (306)