Vetty Creations header

Back to Vetty Creations website

White Threads

Yesterday and today

Yesterday I did some more work on the Christmas ornament that I am making for The Gift of Stitching‘s Christmas ornament issue. I have used some of Stitches and Spice’s gorgeous single ply silk with counted thread embroidery. When I first saw this silk at the craft show in June, I fell in love with its amazing sheen. And working with it is also lovely.

The silk is so smooth and so lustrous. When we were in Portugal a few years back, I learnt of a type of Portuguese embroidery that uses straw sewn onto net, to create patterns. The straw looks like little bits of gleaming gold – an amazing effect when you consider what the fibre is that is being used! When I was working with the “Golden Wattle” silk, I couldn’t help but be reminded of the straw embroidery. It just seems to have a similar sort sheen, in a similar colour.

Yesterday’s part was the construction of the ornament, using a richly patterned red and gold patchwork fabric, along with the embroidered panel. Then lots of lovely gold and red beads.

Sorry that I can’t show it to you – yes, I know, that’s a bit of a tease, isn’t it? You’ll just have to wait until the magazine comes out!

Today’s job will hopefully be boiling my Mountmellick stitch along embroidery, to whiten the fabric, assuming I find the time. If it does get done, tomorrow I’ll explain why I boiled it.

Tonight I’ll be off to the opening of the “Stitch+Stitch=Magic” exhibition, probably meeting a whole lot of people whose names I know, but have never met before. But then, they might find the same thing about me. (And usually the response, whether voiced or not, is that they are surprised that I am so young! I quite enjoy surprising people in that way!) I’m very much looking forward to the exhibition, seeing all the beautiful embroideries, and being very much inspired!

September 13th, 2010 | Category: designing, embroidery musings, favourite needlework items, making stuff, mountmellick embroidery | 2 comments

The Big List of Needlework Magazines

Following on from yesterday, I’ve put together a new page called The Big List of Needlework Magazines. Thanks to those who contributed already. I’d love to have more suggestions and submissions. I’ve already learnt of a great magazine that I’d never heard of before, and I am sure that there are many more that I am yet to learn of!

The more magazines we have listed, the better a resource it will be for people wanting to be inspired! So please send your submissions, as I’d love your input. I’d love to know the magazine’s name, where it is from, its website address, what styles of needlework it features, and what you love about it.

Thanks, and keep them coming!

September 12th, 2010 | Category: favourite needlework items, Introducing... | 3 comments

needlework magazines around the world

In Australia, we are fortunate to have an excellent selection of needlework magazines to inspire us. In terms of hand embroidery alone, I can think of Inspirations, Embroidery and Cross Stitch, The Gift of Stitching, Embellish, Homespun, Creating Country Threads, Handmade, Jill Oxton’s Cross Stitch and Beading, Australian Smocking and Embroidery… and there’s more, I’m sure. Then there are also other needlework types, such as machine embroidery, knitting, quilting, crochet… and there’s magazines for all of them too.

I am less familiar with magazines from around the world, so I thought it might be fun for all of us to put together a list of needlework magazines (any type of needlework – one needle, two needles, a hook etc) from around the world, that you read. If you have a website for the magazine, please include that. If you can tell us what type of needlework it focuses on, and what country it comes from, that would be great too. You can even tell us what you love about it. And they don’t have to be only English language publications. I know there are excellent magazines published in the non-English-speaking world.

My idea is that we might be able to firstly encourage each other with how well the needlework world is going, judging by (hopefully) the sheer volume of magazines that are published on the subject. And secondly, we may be able to introduce our favourite magazine to others!

Go for it – I’m really looking forward to reading of all the wonderful different needlework magazines!

September 10th, 2010 | Category: embroidery musings, favourite needlework items, Introducing... | 9 comments

SAL: buttonhole complete

I made it my aim to finish the buttonhole stitching on the Mountmellick embroidery stitch along cushion yesterday, and I did! It was a bit of a squeeze to get it finished before our evening’s activities, but it is now done.

I thought that it might be useful to explain how I end my buttonhole i.e. how I finish when the end stitching meets up again with the beginning stitching. I like it to have a seamless join, and this takes a bit of nifty (but not difficult) stitching to achieve.
finishing the buttonholeI stitched right up to the beginning of the stitching, leaving space for just one more stitch.

finishing the buttonholeWithout entering the fabric, I slid my needle under the little sticking out tail of the very first buttonhole, from the rolled edge side.

finishing the buttonholeI then inserted my needle in the other end of the space, level with the ends of all the previous stitches.

finishing the buttonholeI took the needle and thread through to the back, so that the stitch has the same tension as all the others. Then I fastened the thread end in the back of the stitching. Voila! A seamless join!

completed Mountmellick embroideryApologies for the quality of the photo, but here is the completed embroidery. Yay! (It really is nice to have that finally done!)

To complete the project, we still have more to do, so don’t tune out just yet!

September 10th, 2010 | Category: embroidery stitches, hints and tips, mountmellick embroidery, stitch along | 11 comments

more progress

I’m still going on the buttonhole edging for my Mountmellick stitch along lily cushion (what a mouthful that is!). I’m about 3/4 of the way around, so its coming along slowly.

If you haven’t been to visit us on Facebook yet, please do. The Vetty Creations fan page is begging for your attention! Join up to become a fan of Vetty Creations, and our updates will show up on your wall. And while you’re there, why not invite your friends to become a Vetty Creations Facebook fan too? Then they can join in the fun also!

On our Facebook page you’ll see a new tab (though if you’ve never visited our Facebook page before, how would you know it was new?!) called “Shop”. I’m very pleased with myself because I managed to figure out how to add a small selection of Vetty Creations products to the page so that you can purchase them while there on Facebook. But of course, the full selection is still available on the Vetty Creations website, which you can get to just by clicking on the “Shop” tab at the top of this blog page.

Hopefully today I might finish the buttonholing… Well, I can live in hope!

September 9th, 2010 | Category: making stuff, mountmellick embroidery, stitch along | Leave a comment

Right-handed stitch dictionary reviews

With its recent release, the reviews for The Right-Handed Embroiderer’s Companion are starting to flow.

On Amazon.co.uk, I found two reviews. An excerpt from the first review:

The diagrams are really clear and along with the clearly written instructions it is almost as good as having one-to-one tuition. Acon “Crafter”

And from the second review:

Both this book and it’s left handed counterpart are amazing books. Very clear instructions and diagrams, easy to follow and inspiring. F. Pullen

The Right-Handed Embroiderer's Companion
If you’ve been wondering about this book, check out the full reviews. You can purchase your copy of The Right-Handed Embroiderer’s Companion from your favourite needlework shop, or direct from Vetty Creations.

September 8th, 2010 | Category: book reviews, The Right-Handed Embroiderer's Companion | 2 comments

Visual-spatial needlework learners

Yesterday I read an article on visual-spatial learners. The opposite to visual-spatial is auditory-sequential.

There was one sentence about visual-spatial learners which, as a writer of step-by-step books, jumped out at me:

They are non-sequential, which means that they do not learn in the step-by-step manner in which most teachers teach.

Ok, so how many of my readers does this apply to? Are there some of you who just don’t get step-by-step books? Here we are, striving to produce clear sequential books, so that people can understand how to work embroidery, and there must be some of you that this just makes no (or little) sense to.

If you’re not auditory-sequential – as I clearly must be! – how do you learn embroidery?

I really hope that at least someone feels brave enough to reply to this. I would love to try to understand, because I might be doing a very good job of teaching some people, but obviously a good number just don’t get my message.

September 7th, 2010 | Category: embroidery musings | 17 comments

What Mountmellick is not

Sometimes, people who have never seen Mountmellick embroidery before have some trouble understanding what makes Mountmellick embroidery distinctively its own style. I know I did, when I first started learning about it!

Because Mountmellick embroidery is a traditional style of embroidery, by studying historical examples, we can come to an understanding of what it really is. You can learn about what Mountmellick IS from the Mountmellick page on the Vetty Creations website and from our book Mountmellick Embroidery: Inspired by Nature. To be a little different, however, let’s talk a bit about what Mountmellick embroidery is not!

Mountmellick is not called Montmellick, Mt Mellick, Mt Melleck, Mountmellic, Montmellic, or any other variation other than Mountmellick embroidery. The name comes from the name of the town where the style of embroidery developed. It is in County Laois in Ireland. If you’re looking at a map of Ireland, find Dublin on the east coast, then head westward to about the middle of the country. Around there you will find the town of Mountmellick. Its not a large town by any means, and certainly not on the tourist route. So if its not on your map, that may be why.

Mountmellick embroidery is not coloured. When Sister Teresa Margaret McCarthy of the Presentation Convent in Mountmellick, Ireland – who is seen as the mother of Mountmellick embroidery’s revival – started investigating the embroidery, all she had were some line drawing patterns, with no indication of how they should be stitched. She assumed (as most of us probably would) that they would be worked in colour. When people heard of her interest and started bringing her examples from their linen cupboards, she learned that it is always whitework – white thread on white fabric. Its not even cream on cream, although an old piece before it is washed can look like that.

Mountmellick embroidery does not use shiny thread – the thread is completely matt. I’ll say it in another way: the thread has no shine. None. Nothing. Zip. Is that clear enough? That means that perle/pearl cotton is too shiny. Somewhat surprisingly, it also means that even coton a broder/broder cotton, is too shiny. So is cotton floche. Mountmellick thread has no shine.

Mountmellick embroidery does not use silk, wool, linen, rayon or any other type of thread other than cotton. In times past, thread manufacturers wanted to promote their products in different ways, sometimes even producing booklets about various styles of embroidery utilising their range of threads. Because of this you can find booklets on Mountmellick embroidery which specify silk threads. However, traditional Mountmellick embroidery only ever used cotton thread. This is because the town of Mountmellick was in a cotton growing area. Mountmellick was even known as the Manchester of Ireland, because of its strength in the cotton industry. They grew cotton, milled it and spun it locally, therefore its what was used for their local style of embroidery.

Mountmellick embroidery is not small and dainty. It does not have tiny, sweet, little flowers and plants. It is big and bold. The plants are lifesize or even larger. Taking a design and making it smaller (because, for example, it will fit better on your tablecloth or cushion) means its not really Mountmellick embroidery anymore.

Mountmellick embroidery does not have just any plants. The plants are those which grew in the hedgerows, along the River Owenass which flows through Mountmellick, and wild in the gardens of the town of Mountmellick. As time went on, just a few extras such as lilies were added to this, but they didn’t go overboard. You won’t find native Australian plants in Mountmellick embroidery! You won’t find camellias, hollyhocks, lupins, snapdragons, irises, carnations, marigolds… It doesn’t have mushrooms, gnomes, butterflies, bugs, caterpillars or fairies in amongst the flowers. Occasionally, though very rarely, you will find a small bird, shell or even a pineapple, but these are exceptions, rather than the rule.

Mountmellick embroidery is not worked on damask, linen, twill, poplin, calico or any other fabric other than cotton satin jean. The sheen on the satin jean fabric is meant to contrast with the lack of shine on the thread, creating an interesting juxtaposition.

Mountmellick embroidery is not candlewicking. Mountmellick embroidery uses a much larger range of stitches than candlewicking. The stitches are predominantly knotted and padded stitches, and while the candlewicking that we know these days has knots, they are colonial knots, which are not used in Mountmellick embroidery. Mountmellick embroidery is always floral, whereas candlewicking is not always floral.

Mountmellick embroidery does not use just any stitches. There is a range of stitches that are generally accepted as those used in Mountmellick. They are often knotted and padded stitches, providing texture to the embroidery. You will not find long and short stitch, colonial knots, trellis stitch, cross stitch or many others in Mountmellick embroidery. You cannot just choose any old stitch to use in your Mountmellick project. Mountmellick Embroidery: Inspired by Nature has clear step-by-step instructions for the stitches used in Mountmellick embroidery.

I could probably go on with more, as there are many more things that Mountmellick is not, but perhaps it might just head towards being ridiculous e.g. its not a bike, or a mountain…!

September 6th, 2010 | Category: embroidery musings, embroidery stitches, historical embroidery, mountmellick embroidery, Mountmellick Embroidery: Inspired by Nature, mountmellick supplies, whitework | 4 comments

SAL: Looking at buttonhole stitch

Today I want to focus on a small discussion that one of our stitch along participants and I have had over the last week.

SJ had said that she was making good progress on her stitch along embroidery, but she wasn’t happy with her buttonhole stitch. Without being able to see her buttonholing, there was one big thing I could suggest: try stitching in the opposite direction.

You may have noticed what a difference this has made to my buttonhole stitching during this stitch along. When I was working on the petals of the main flower, I tried stitching one direction first, which I wasn’t happy with, and then tried the other direction, which looked much better.

And as it turns out, I’m working the buttonhole stitch around the edge of my cushion is in the opposite direction to what I used on the petals. But this time it looks ok!

So, what do I mean by stitching in the opposite direction? I have observed over many years of teaching, that many people work their buttonhole differently. (And this is not just explained by the question of left or right-handed.) Some work with their stitching going from left to right, and others with it right to left. Some work with their needle inserted towards them, some with it going away from them. Some work with their stitching travelling up to down, others down to up. Some have their needle inserted right to left, and others have it left to right.

With the right process of stitching, all of these can produce buttonhole stitch, but the look of the stitch may differ, because of thread twist.

Let’s look at an example:
buttonholeHere’s my buttonhole stitching around the edge of my cushion. I am working with my needle going in at the left and coming out at the right. My stitching travels upwards.
buttonholeTo stitch in the opposite direction, I could keep my needle going in left and coming out right, but having my stitching travelling downwards (shown above).
buttonholeAlternatively, I could keep my stitching going upwards, but have my needle going in at the right and out at the left (shown above). This would also mean that I am stitching in the opposite direction to what I first suggested.

If you prefer having your needle coming towards or away from you (rather than left to right or right to left) turn the work 90 degrees.
buttonhole buttonhole These two produce the same result as each other.

Because I am using S twist thread, my method described earlier and shown in the photo produces a buttonhole stitch where the rolled edge melts into the other stitching a little.

starting from the topGoing the opposite direction produces stitching where the rolled edge is very pronounced (shown left). Each of these are buttonhole stitch, but just with a different effect because of stitching direction and thread twist.

If you’re not understanding this, please get out your needle and thread and try it. You MAY find stitching in the opposite direction than what you are used to, to be a little difficult. It may seem a little backwards! But please try it, and see how it affects the look of the stitch.

Back to SJ’s buttonhole stitch. The next day she triumphantly commented to say that changing her stitch direction had made an enormous difference, and where before she had been struggling with keeping her stitches close together, the change of direction had fixed all that. Wonderful result!

September 5th, 2010 | Category: embroidery musings, embroidery stitches, stitch along | 3 comments

finished brooch

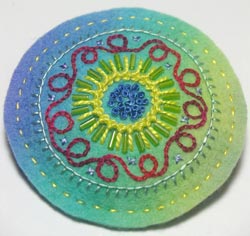
Yes, it turned out to be a brooch – the colourful little embroidery I have been working on over the past few days worked its way into a brooch. This is mostly because I have been really pushed for time this week, with very little extra brain space for idea generation…
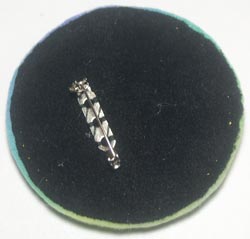
carina's felt broochback of carina's broochI used a couple of layers of wadding to give the brooch some puffiness. A circle of buckram gave the brooch some stiffness and strength. The wadding and buckram are sandwiched between the front embroidered panel, and the backing fabric (a black, non-fraying suede), which are running stitched together. The brooch clasp is sewn onto the backing fabric.

September 4th, 2010 | Category: making stuff | One comment
« Newer Entries  
  Older Entries »
Yvette Stanton White Threads is the blog of Yvette Stanton, the author, designer, publisher behind Vetty Creations' quality needlework books and embroidery products.

New book now available!

Hardanger Filling Stitches
Hardanger Filling Stitches by Yvette Stanton. Order your copy today!
Find us on Facebook

Archived posts

Categories

  • book reviews (88)
  • Christmas ornament swap (13)
  • colour (6)
  • crazy hair (6)
  • customer embroidery (49)
  • designing (119)
  • dressmaking (26)
  • Early-Style Hardanger (91)
  • Elegant Hardanger Embroidery (42)
  • Elizabethan embroidery (25)
  • Embroidery classes (189)
  • embroidery musings (436)
  • embroidery stitches (206)
  • errata notices (11)
  • Ethnic embroidery (49)
  • exhibitions (111)
  • exploring the needlework internet (10)
  • favourite needlework items (69)
  • FlossTube (102)
  • Frisian whitework (73)
  • goldwork (12)
  • hardanger (232)
  • Hardanger Filling Stitches (72)
  • Hardanger Filling Stitches (1)
  • hints and tips (114)
  • historical embroidery (119)
  • how-to videos (34)
  • illustration (1)
  • Inspirations (25)
  • Introducing… (90)
  • left handed embroidery (78)
  • magazines (10)
  • making stuff (271)
  • merezhka (35)
  • mountmellick embroidery (176)
  • Mountmellick Embroidery: Inspired by Nature (60)
  • mountmellick supplies (49)
  • new products (104)
  • online book previews (7)
  • pattern darning (19)
  • pattern drafting (11)
  • photography (2)
  • Portuguese embroidery (166)
  • Portuguese Whitework: Bullion Embroidery from Guimarães (74)
  • public thanks (32)
  • published projects (27)
  • Punt 'e Nù (32)
  • Sardinian Knotted Embroidery (77)
  • sewing tips (9)
  • Smøyg (41)
  • Smøyg: Pattern Darning from Norway (39)
  • soapbox (6)
  • stitch along (44)
  • stitch dictionary (45)
  • teaching embroidery (192)
  • The Left-Handed Embroiderer's Companion (104)
  • The Right-Handed Embroiderer's Companion (70)
  • travel (172)
  • Ukrainian Drawn Thread Embroidery (35)
  • Uncategorized (169)
  • video previews (5)
  • White Threads Blog (91)
  • whitework (364)
  • writing books (306)