Vetty Creations header

Back to Vetty Creations website

White Threads

proud mum

flower cushionOn Saturday I had a half day just with my younger daughter, age 6. She had expressed a very strong desire to do some embroidery with me. So we did.

Firstly she drew a flower on some paper, and I traced it onto the fabric. We were using fabric and thread left over from my mini class at the craft show last year, so while there were only a few colours of thread to choose from, she was quite happy with them.

She decided to outline the flower petals in outline stitch. I started her off, and then she kept going. I did have to restart her for each new petal, because outline (and the closely related stem stitch) are not the most easy ones to change direction with. She’s not the most exacting little girl, so she didn’t really worry if the needle accidentally came out on the wrong side of the thread! 🙂

Once the petals were complete, she chain stitched the stem. I showed her one stitch and she was off. Then she wanted to choose another stitch for around the leaves but wasn’t sure what. She looked through the entire The Left-Handed Embroiderer’s Companion (she’s a leftie too) but nothing caught her fancy (oh dear, my book is wanting!). So she “made up” her own stitch. Actually it was just running stitch, but she worked it short and knobby, so she named it “knob stitch” and was extremely proud of herself for devising a “new stitch”.

flower closeupThen she worked a cross stitch in the flower centre, and French knots around it. I showed her one French knot and she didn’t need me anymore for them either. She then worked two French knots in the leaves.

I was very surprised about how independent she was with her stitching. I really only needed to be there to demonstrate the stitches once, thread needles, start new threads, and listen to her unending commentary about where she’s up to!

Once she’d finished the embroidery, I asked her if she’d like to make it into a cushion. She was so excited! So we got out the sewing machine and I set it up for her. She couldn’t reach the floor to press the presser foot, so I put a carton of my books there and placed the presser foot on top.

We pinned the front and back of the cushion together, with right sides together. She understood why they had to be right sides together. She operated the presser foot, and I guided the fabric through the machine. She learnt how to pivot at the corners, including getting the needle to stay down in the fabric, then lifting the sewing foot, and turning the fabric.

Please understand this whole process is accompanied with a very high level of excitement!

I showed her how to tie off the threads and clip the corners of the cushion. We turned it right side out through a gap we left in one side, making sure the corners were fully turned. It was stuffed with polyester fibre fill, and then together we whip stitched the gap closed. I started it off for her, she did a bit, then she got me to do the rest.

And she was the absolute picture of happiness, looking at her first embroidery project made into something REAL! She’s been showing it off to family and friends ever since, and now I’m showing it off to you! 🙂
January 26th, 2011 | Category: embroidery stitches, left handed embroidery, making stuff | 10 comments

housekeeping

I know that quite a lot of you subscribe to my blog so that the posts flow into your inbox each day without any effort on your part. All you have to do is read! How good is that?!

Sometimes people hit “reply” in their email program to these email posts, and these emails come directly to me, but the replies are not put as comments on the blog. If you would like your reply to show up as a comment on the blog, please make sure you click on the blog post title (as an example, today’s would be “Housekeeping”). You can click on either the grey version of the title at the top of the email, or the greeny-blue one just a little further down. Both will take you to the blog on the internet where you can then post your comment for all to see and share in.

If you haven’t already subscribed to the blog, I encourage you to do so. It makes it so much easier. Just click on the “Subscribe by email” link at the top of the right-hand column on this blog. This will take you through a double opt in process – once you’ve entered your details in the form that comes up, you will then have to confirm your subscription by following the instructions in the email that is sent to you. If you don’t do both steps, you won’t be subscribed.

The reason the blog uses this two step process is to weed out any people/computers/spambots who enter other people’s email addresses.

So, sign up today!

January 25th, 2011 | Category: Uncategorized | Leave a comment

last week of school holidays

This is the last week of the school holidays here, and its going to be hot. It will be filled for us with last minute things to get done before school starts: dentist’s appointments, doctor’s appointments, and maybe a trip to the beach as my daughters really wanted to go some time during the holidays and it hasn’t happened yet!

And in between all that, I’ll be finishing off some embroideries, photographing them and sending the photos off to their destination for inclusion in a publication. There’s some Mountmellick (still to be finished), some Hardanger (half done – still some problem solving to be done there), and some other embroidery. Its been really fun doing it all.

I’ve got quite a few Mountmellick classes coming up this year too, so once school goes back next week, I think I’ll be getting on with preparing the class projects. And then I’ll get back to my book, which I’m so looking forward to seeing grow.

There’s also a few more garments that I want to make. I had a lovely chat with a friend at church yesterday who wants to explore button and fabric shops with me, so that should be fun. Maybe we’ll take a day trip one day and have an adventure.

So what are you working on at the moment? Anyone care to share?

January 24th, 2011 | Category: Embroidery classes, hardanger, making stuff, mountmellick embroidery | 5 comments

magnification

When I was teaching merezhka on Monday I learned of some amazing products that I’d never seen before. They were small acrylic domes that you placed on whatever you needed to magnify, and because of the shape of the dome, it magnified it beautifully.

There was no need to “position” yourself correctly, or try to focus properly – the magnification just happened.

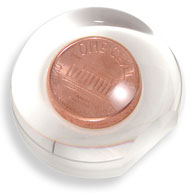
Lumidome magnifierI can see all sorts of applications for tools like this:

  • you can place it on your pattern to magnify the bit you’re up to
  • you can place it on a piece of needlework to get a better, closer view of how its been done
  • you can place it on your own needlework to get a better view of what you’ve just done (to fix a mistake or identify a mistake, etc – not that *you’d* ever make a mistake!)
  • you can use it to teach your children about refraction of light (yes, I know, slightly odd, but this is something I would do with one!)

The photo is of one of these loupes called a “lumidome”. It shows a US one cent piece magnified in it, with a 3x magnification. Such a simple tool! I’m looking at getting some of these to sell, so if you are interested, please let me know.

January 22nd, 2011 | Category: favourite needlework items | 3 comments

finished dress

I couldn’t leave you hanging, wondering how the dress was going, so here’s a photo of the finished product. I’m very happy with it, and it feels great to wear.

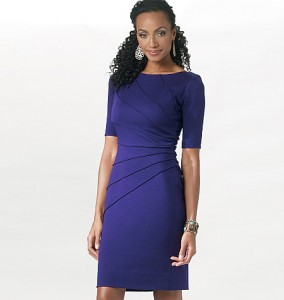
Finished red Maggy London dress, Butterick B5559

Maggy London dress, Butterick B5559


I have some of the fabric left over. Enough to make a sleeveless top. Now I just have to find a suitable pattern. But that’s definitely for another day!

January 21st, 2011 | Category: making stuff | 17 comments

red tucks and darts

I dreamt about red tucks and darts last night, which might tell you what I was doing yesterday. I completed the cute little pink leotard for my niece and was able to make a start on creating my Butterick B5559 red dress. WITH sleeves – thanks to all who voted on the sleeves or not sleeves question. I could have happily had it with or without, but the majority voted for sleeves, so I’ll go with that.

After reading several accounts of making 5559 on blogs, such as Sew Silly and Life Happens Be Positive, I was a bit daunted about transferring all the tucks and darts to the fabric. However, I appreciated their honesty about the pitfalls of this pattern, which is why I am adding to the general knowledge about making this pattern by adding my comments and the process I used in this blog posting. Hopefully my tips and tricks might help someone else too!

I figured that I needed the foldlines for the tucks on the front of the fabric (and therefore non-permanent marking lines) and the darts on the back. So firstly I traced each pattern piece onto butchers paper so that I didn’t destroy my pattern with whatever method I eventually chose. I then used these to cut out the pattern pieces and left them in place for the transferring of all the important lines.

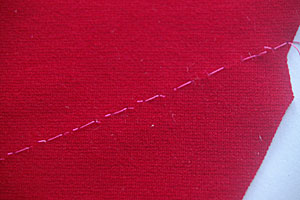
For the darts and tucks I considered using tailor’s chalk, but the only one I have makes very faint useless lines, and rubs the fabric in the process, so that was deemed unacceptable. I considered using water-soluble fabric markers, but they would mean that I could not iron the fabric before it had been washed out. I tried out the tailor’s tack function on my sewing machine, but it was going to give me a zigzagging line, which wasn’t accurate enough in my mind. I was thinking it was going to be a case of hand running stitching along each of the foldlines, when I realised that I could use a very long basting stitch on my sewing machine and simply sew along the foldlines marked on my butchers paper pattern. Yay! That would save hours.

So I did this and then realised that it was going to create a new problem. You see, because the fabric is a knit, I need to stretch it when sewing, so that it retains its stretch, even along the seams. But if I had a line of non-stretchy basting, it would stop me from doing that. Hmm…

Butterick B5559 basted bodice

Machine basted foldlines on bodice back


Butterick B5559 basted skirt back

Machine basted foldlines and hand tailor tacked darts on skirt back

While solving this, I tailor tacked all the dart points by hand. That was easy enough, and not overly daunting. I did it at the dinner table while my children were finishing their dinner. I ripped away the paper, which is pretty easy with butchers paper as its only a low grade paper, leaving the basted foldlines and dart markings.

Butterick B5559 pattern being ripped away

Ripping away the butchers paper pattern

Butterick B5559 snipped machine basting

The snipped machine basting

My eureka moment was when I realised that if I carefully snipped between every second basting stitch (front and back), the basting should stay long enough for me to stitch, while still allowing me to stretch as I sewed. And it worked! It did mean that I had heaps of short bits of thread that had to be removed once the tuck was sewn, but that’s a small price to pay for saving hours of hand tacking time! When I make this pattern again (and I will!) I’ll use the special basting stitch on my machine that makes the basting twice as long again.

So instead of taking days to mark up all the pattern pieces, which is what I was expecting, it took only about two hours, including the tracing time for making my butchers paper patterns. And then I was able to start sewing. I’ve done the front, and today I should be able to get it finished. I’m loving sewing the ponti. It is firm and stable and lovely to work with.

And yesterday I realised that there will be an excellent opportunity to wear the dress in the near future. Each year, my husband’s school starts the year with a cocktail party. One red party dress coming right up! 🙂

Added later: You can see the finished dress here.

January 20th, 2011 | Category: making stuff | 6 comments

More Mountmellick and some sewing

I spent yesterday working on my current Mountmellick design which is to be submitted as a class proposal for Beating Around the Bush in 2012. I’m having fun! The design is more lilies (we did a lilies design for our Mountmellick stitch along last year) but this time I am using a combination of some stitches for the flowers that I’ve never used before, and I’m quite pleased with the effect.

I’ve had a plan to make a leotard for my young niece who’s going to start doing gymnastics this year. They came over last night for dinner and so that I could measure her. My brother in law had wondered why I wanted to measure my niece, and my sister in law pointed out that obviously I was going to make a dress for my niece. I told her that no, its not a dress I’m making. She said “whatever it is that you’re making, I have one request. It has to be pink, or she won’t wear it.” This is absolutely fine, because I my mother in law warned me of this, and I bought pink for it the other day! I cut the fabric out last night after they went home, so it should stitch up quite quickly this morning.
Butterick B5559
And the other news is that I received my dress pattern (Butterick B5559) in the mail yesterday. The red ponti has been washed, and I’m looking forward to starting the dress today. My main dilemma is sleeves or no sleeves? I like both options, but I’m just not sure which. My fabric is very RED, and I wonder if no sleeves will mean there is a bit less red, and therefore be a bit less in your face. But then sleeves will mean that it can be worn in slightly cooler weather, and they do look quite smart…

Clicking on the picture will take you directly to the Butterick website (where I bought it) where you can see the pattern and also the non-sleeved version. I’ve realised that in my travels over the web, I have not seen this pattern made up with no sleeves. I wonder if anyone has? I wonder how it looks?

A friend has done some digital mischief and mocked up me and the dress together to give me an idea of how it will look. Thanks Karen! Warning – these photos are hilarious! And I will never ever ever be that thin (and nor would I want to be!).
yvette sleevelessyvette sleeves

January 19th, 2011 | Category: making stuff, mountmellick embroidery | 5 comments

merezhka and mountmellick

I had a wonderful day yesterday teaching merezhka to a lovely group of ladies in Springwood. They did a great job and produced some beautiful embroidery.

A couple of the ladies in the group had already bought my book Ukrainian Drawn Thread Embroidery and worked the large scale sampler (we were doing a project of small scale technique in class) prior to the class. One of them raved about the instructions in my book. She said that they were so detailed and couldn’t be more clear. She said (my memory of her words) “you know how sometimes there are steps missing and you don’t know what to do next? Well, there were no steps missing in Yvette’s book.” I asked her when she was going to write her comments down!

Because this lady had already done some merezhka, she had already been thinking about it, and had a list of questions for me. Could she use filet crochet or filet lace patterns for merezhka? Yes. It would require a bit of thought to figure out how the closed and open bits would translate, but yes. Could you work merezhka in a circle with stepped sides, rather like you can with hardanger? Yes… you could. I’ve never done it, but you could.

I also discussed sources for merezhka patterns with another lady. Another suggestion that I had was for monochrome cross stitch patterns. To adapt these, wherever there is a cross, you could work a layering, and wherever there is blank fabric (no cross), you would have the gaps between layerings. I reckon it would take me a good while to adapt something like this – to get my head around how to adapt it – but it certainly could be done.

Last night I was surprised to find an email in my inbox with a scan of a completed embroidery. Yes, someone had already finished theirs last night, and it was beautiful. Thanks for sharing it with me. I always love to hear of people being so enthused that they finish their class project as soon as possible.

One of the other ladies in the class regularly teaches embroidery, and has been telling all her students about my books, particularly The Left-Handed Embroiderer’s Companion and The Right-Handed Embroiderer’s Companion. She gave them a huge plug by saying “We think these are even better than the A-Z books.” Wow! What a fabulous thing to say. Thank you!

My train journeys to and from Springwood were smooth, and I did get quite a lot of my Mountmellick done. I was surprised how tired I didn’t feel at the end of the day. I’d say it was because I was able to relax on the train home, with some enjoyable embroidery. They’d like me back later in the year to teach Mountmellick embroidery. I’m keen!

Thanks for a great day ladies!

January 18th, 2011 | Category: Embroidery classes, merezhka, mountmellick embroidery, teaching embroidery, The Left-Handed Embroiderer's Companion, The Right-Handed Embroiderer's Companion, Ukrainian Drawn Thread Embroidery | One comment

a day of merezhka

Today I’m off to Springwood to teach a merezhka class all day. It should be a great day. Springwood is about 1 1/2-2 hours on the train from where I live, so I’m taking my latest Mountmellick embroidery project with me, and hopefully I will get a lot done!

boronia merezhkaIn the class we’re going to be learning the small scale merezhka technique, and making a small square panel of the embroidery. It could be framed or made into a needlecase, or applied to a bag. You could even mount it as the centre panel on a cushion. Lots of things you could do with it!

If you’d like to learn this technique, you can find it in my book Ukrainian Drawn Thread Embroidery. It has clear step by step instructions, which have text, a diagram and a photo, to make it very clear about what you should be doing for each step. Many people comment on this threefold method of instruction when they review the book, because it is unusual, and works so well.

I know that I’m going to have a fun day. I hope you do too. 🙂

January 17th, 2011 | Category: Embroidery classes, merezhka, teaching embroidery | 2 comments

ponti update

Last week I put out a request for people to tell me where I might find ponti (or ponte) fabric. I did not expect to be overwhelmed with responses, and I was not! My trip to The Fabric Store in Surry Hills taught me what ponti is, but their selection of colours was not to my liking.

I had also emailed Tessuti Fabrics, who have a number of shops in Sydney and Melbourne, and tend to focus on high quality fabrics often imported from places like Italy. I figured they might have some ponti too, knowing that it had been mentioned in the past on their blog.

The very helpful Colette from Tessuti got back to me on Tuesday saying they had recently received a shipment of ponti from Italy in black and a stone colour. Neither of these was really what I wanted, though I felt I could live with a LBD (little black dress). I actually wanted a *colour*, such as red or a nice blue.

So off I went to Chatswood Tessuti, and found that while the Italian ponti hadn’t arrived in store yet (it was on their website only, but should be in store early next week) they did have a lovely red ponti, and discounted for their January sale! Happily, the red was purchased.

Now I’m just waiting on the pattern to arrive (Butterick 5559). Well, not quite. I actually have much high priorities in terms of work at the moment, but I definitely can’t make the dress until the pattern arrives! I’ll use the red for the dress, and the blue I purchased on Monday at Cabramatta to make a long sleeve top version of it. (The pattern does not include this option, but I can adapt it.)

January 15th, 2011 | Category: making stuff | Leave a comment
« Newer Entries  
  Older Entries »
Yvette Stanton White Threads is the blog of Yvette Stanton, the author, designer, publisher behind Vetty Creations' quality needlework books and embroidery products.

New book now available!

Hardanger Filling Stitches
Hardanger Filling Stitches by Yvette Stanton. Order your copy today!
Find us on Facebook

Archived posts

Categories

  • book reviews (88)
  • Christmas ornament swap (13)
  • colour (6)
  • crazy hair (6)
  • customer embroidery (49)
  • designing (119)
  • dressmaking (26)
  • Early-Style Hardanger (91)
  • Elegant Hardanger Embroidery (42)
  • Elizabethan embroidery (25)
  • Embroidery classes (189)
  • embroidery musings (436)
  • embroidery stitches (206)
  • errata notices (11)
  • Ethnic embroidery (49)
  • exhibitions (111)
  • exploring the needlework internet (10)
  • favourite needlework items (69)
  • FlossTube (102)
  • Frisian whitework (73)
  • goldwork (12)
  • hardanger (232)
  • Hardanger Filling Stitches (72)
  • Hardanger Filling Stitches (1)
  • hints and tips (114)
  • historical embroidery (119)
  • how-to videos (34)
  • illustration (1)
  • Inspirations (25)
  • Introducing… (90)
  • left handed embroidery (78)
  • magazines (10)
  • making stuff (271)
  • merezhka (35)
  • mountmellick embroidery (176)
  • Mountmellick Embroidery: Inspired by Nature (60)
  • mountmellick supplies (49)
  • new products (104)
  • online book previews (7)
  • pattern darning (19)
  • pattern drafting (11)
  • photography (2)
  • Portuguese embroidery (166)
  • Portuguese Whitework: Bullion Embroidery from Guimarães (74)
  • public thanks (32)
  • published projects (27)
  • Punt 'e Nù (32)
  • Sardinian Knotted Embroidery (77)
  • sewing tips (9)
  • Smøyg (41)
  • Smøyg: Pattern Darning from Norway (39)
  • soapbox (6)
  • stitch along (44)
  • stitch dictionary (45)
  • teaching embroidery (192)
  • The Left-Handed Embroiderer's Companion (104)
  • The Right-Handed Embroiderer's Companion (70)
  • travel (172)
  • Ukrainian Drawn Thread Embroidery (35)
  • Uncategorized (169)
  • video previews (5)
  • White Threads Blog (91)
  • whitework (364)
  • writing books (306)